
How I Use Lore Forge to Write My Fiction

Most writers have probably never heard of Lore Forge, but it has become my go to program to write in. Since I see a lot of people asking what other writers use to keep their creations organised, I thought I would do a bit of a deep dive into my favourite program, how I use it, the upsides and downsides it has.
I’m not sponsored by Lore Forge, nor am I receiving any kind of incentive to write this. It’s just my views and experiences, and I want to share my love for an underrated program with you.
PSA: If you’re reading this via email, it’s actually too long for that format with the screenshots I’ve included. I recommend reading on the web or the app for the best experience.
What drew me to Lore Forge in the first place?
I’m usually a fairly disorganised person. I have so many folders on my computer and GDrive labelled “stuff” or “backup” that I don’t even want to count them. However, that disorganisation comes at a cost in that I was wasting time hunting for the various documents I wanted and, when it comes to writing a full-length novel, most word processors would slow down the longer the document became. That meant individual documents for each chapter, which meant no way to search for something across the whole thing, losing where I saved things, needing to open document after document to find what I was looking for, and… well, you get the idea.
What I wanted was a program that would keep my stories organised, while still allowing me to easily head hop. One of the most common suggestions for this is Scrivener. So, come NaNoWriMo (RIP), nearly every year I would download the trial version of Scrivener and waste that first day or two trying to learn it, to set it up, and generally getting lost in it before realising that I had wasted so much time in trying to learn the bloody thing that I now had to make up nearly 3,000 words just to catch up. Oh, and outside of November, it was really expensive.
So, Scrivener didn’t work for me. It was too complicated to learn quickly, unintuitive, and expensive. Hot take, I know. I understand there are a lot of die hard fans of the program that I am probably alienating at best, or inviting their wrath at worst, but it just didn’t work for me. Maybe it’s a Mac versus PC thing (I despise Mac), or maybe my brain just made different connections, who knows? But it was a lost cause for me.
I tried various other programs, but nothing really had everything I wanted. I wanted something that was not only a text editor, but had extensive character sheets, world building elements, plot planning and structuring, cloud backup, all in an easy-to-understand package for a low, low price with absolutely no subscription.
Was I asking too much?
Yeah, probably.
And then my husband found Lore Forge. Truth be told, I don’t know how he wandered onto it, probably one of the random rabbit holes he goes down at 3am planning a D&D campaign or something. Knowing what I was looking for in a writing program, he recommended I try it.
I checked out the website (which you can here, if you’re so inclined), saw that it had a free version so downloaded it and booted it up.
And, guys. Guys! It’s fantastic!
I believe it was originally created to plan D&D campaigns, so it works fantastically with fantasy or other world stories, and is especially good for writing a series since each “Project” holds multiple “Stories”. Each story can then be broken down further into chapters, and each chapter into scenes so you can really get into the nitty gritty of your structuring.
The character profiles were nicely laid out with lots of detail you can add (or ignore) as well as the option to add custom headings (I add custom headings for Enneagram profiles, for example). There are also cards for Locations, Cultures, Discoveries, Items, Species, and more.
And all of this is completely free!
There is a subscription option for $5.99/month (I believe that’s probably USD, but it doesn’t specify and I tend to assume that if it doesn’t specify it’s USD, since that’s the only country that assumes everyone uses their currency). But honestly, while it might be nice to have since it includes online projects, automatic syncing between devices, a web map that’s mobile friendly, custom background images for scenes and notes, and a few other things, I don’t find that I really need it.
Finally, it’s available on Windows, Mac, and Linux.
How each of the sections are organised
Lore Home Page
When you first boot up Lore Forge, you’re presented with this home page. It has three menus:
Projects
Settings
About
Projects
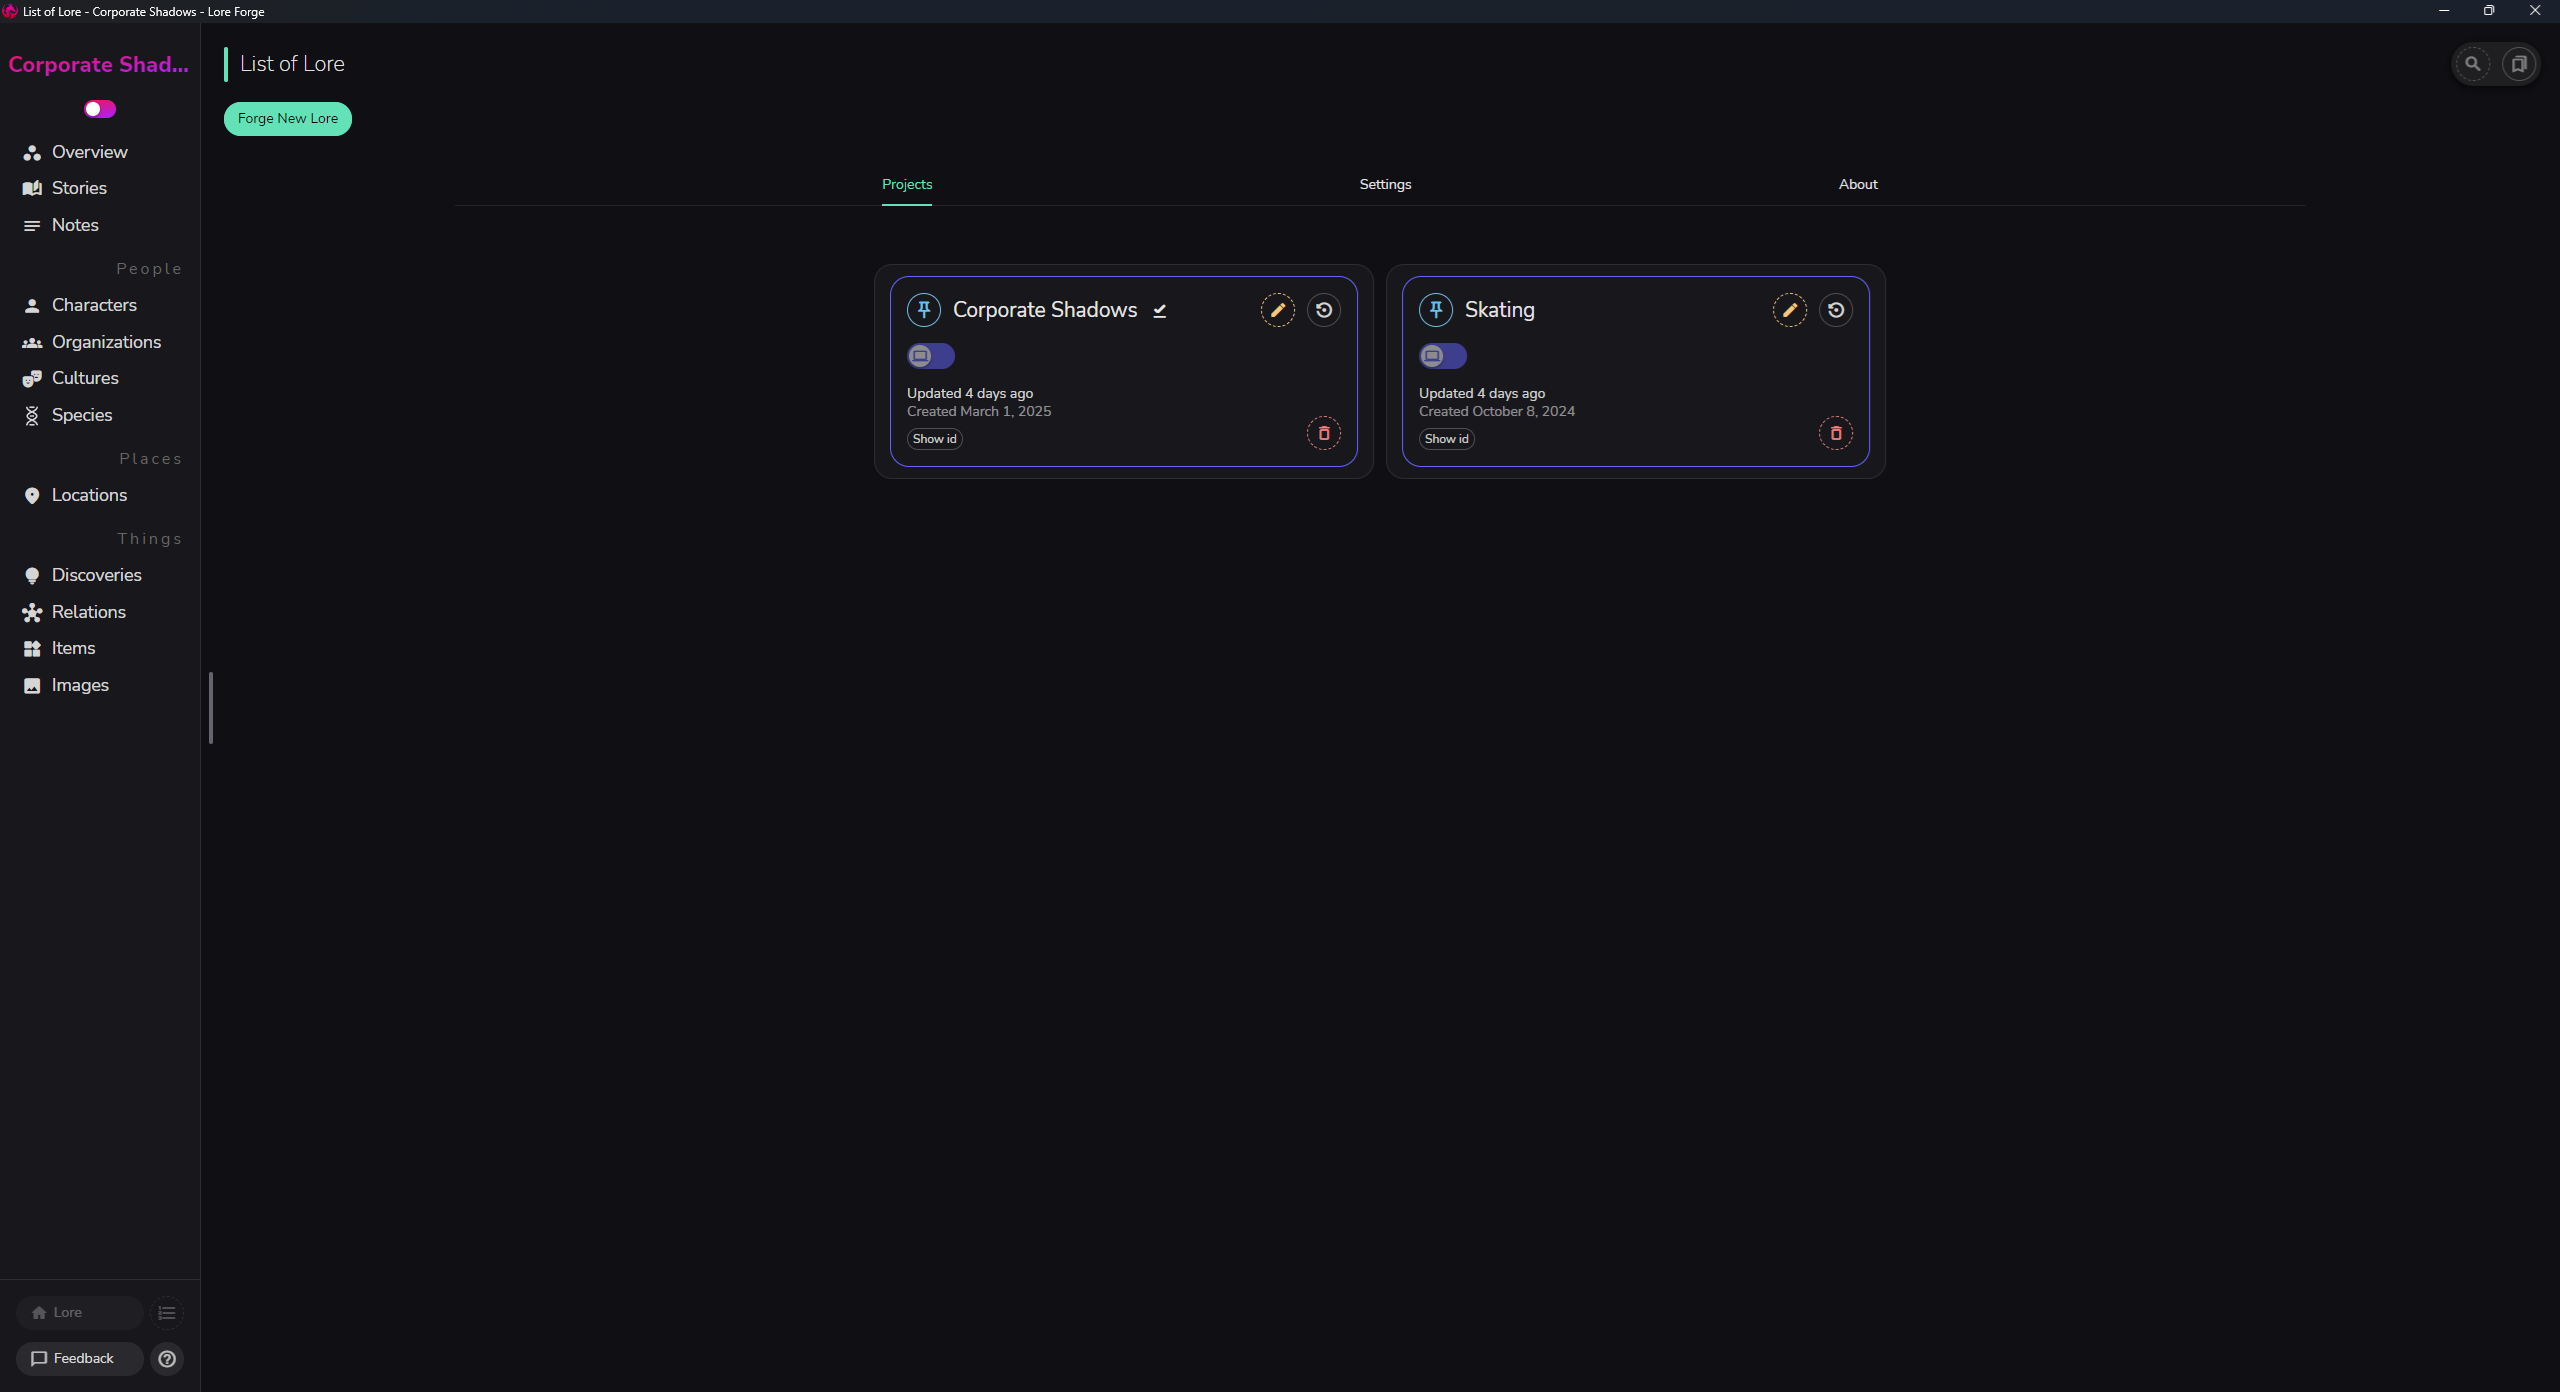
This is where all your projects are displayed. Think of them like the highest level folder in your filing system. Everything about a particular series goes in here. If you’re writing a standalone story, that story is also the project, but if you’re writing a series, each book (or story) goes into the project. I hope that makes sense. So in the image above, Corporate Shadows is a series, and Skating is a standalone story, but both are displayed here.
Settings

Settings is, well, settings. This is where you set up where you want to save your work (and create back ups. DO THIS! Don’t be like me, forget it exists, then accidentally delete your project folder and have to redo weeks of writing cries silently to self). You can also set whether you want spell check to be active here and, best of all, what language to check in! There are 14 languages that are supported at the time of writing, as well as four versions of English (US, UK, Australia, Canada).
About
This shows you the current version number you’re running, as well as links to Lore Forge’s socials. I practically never looked at this page before writing this article.
Project Dashboard
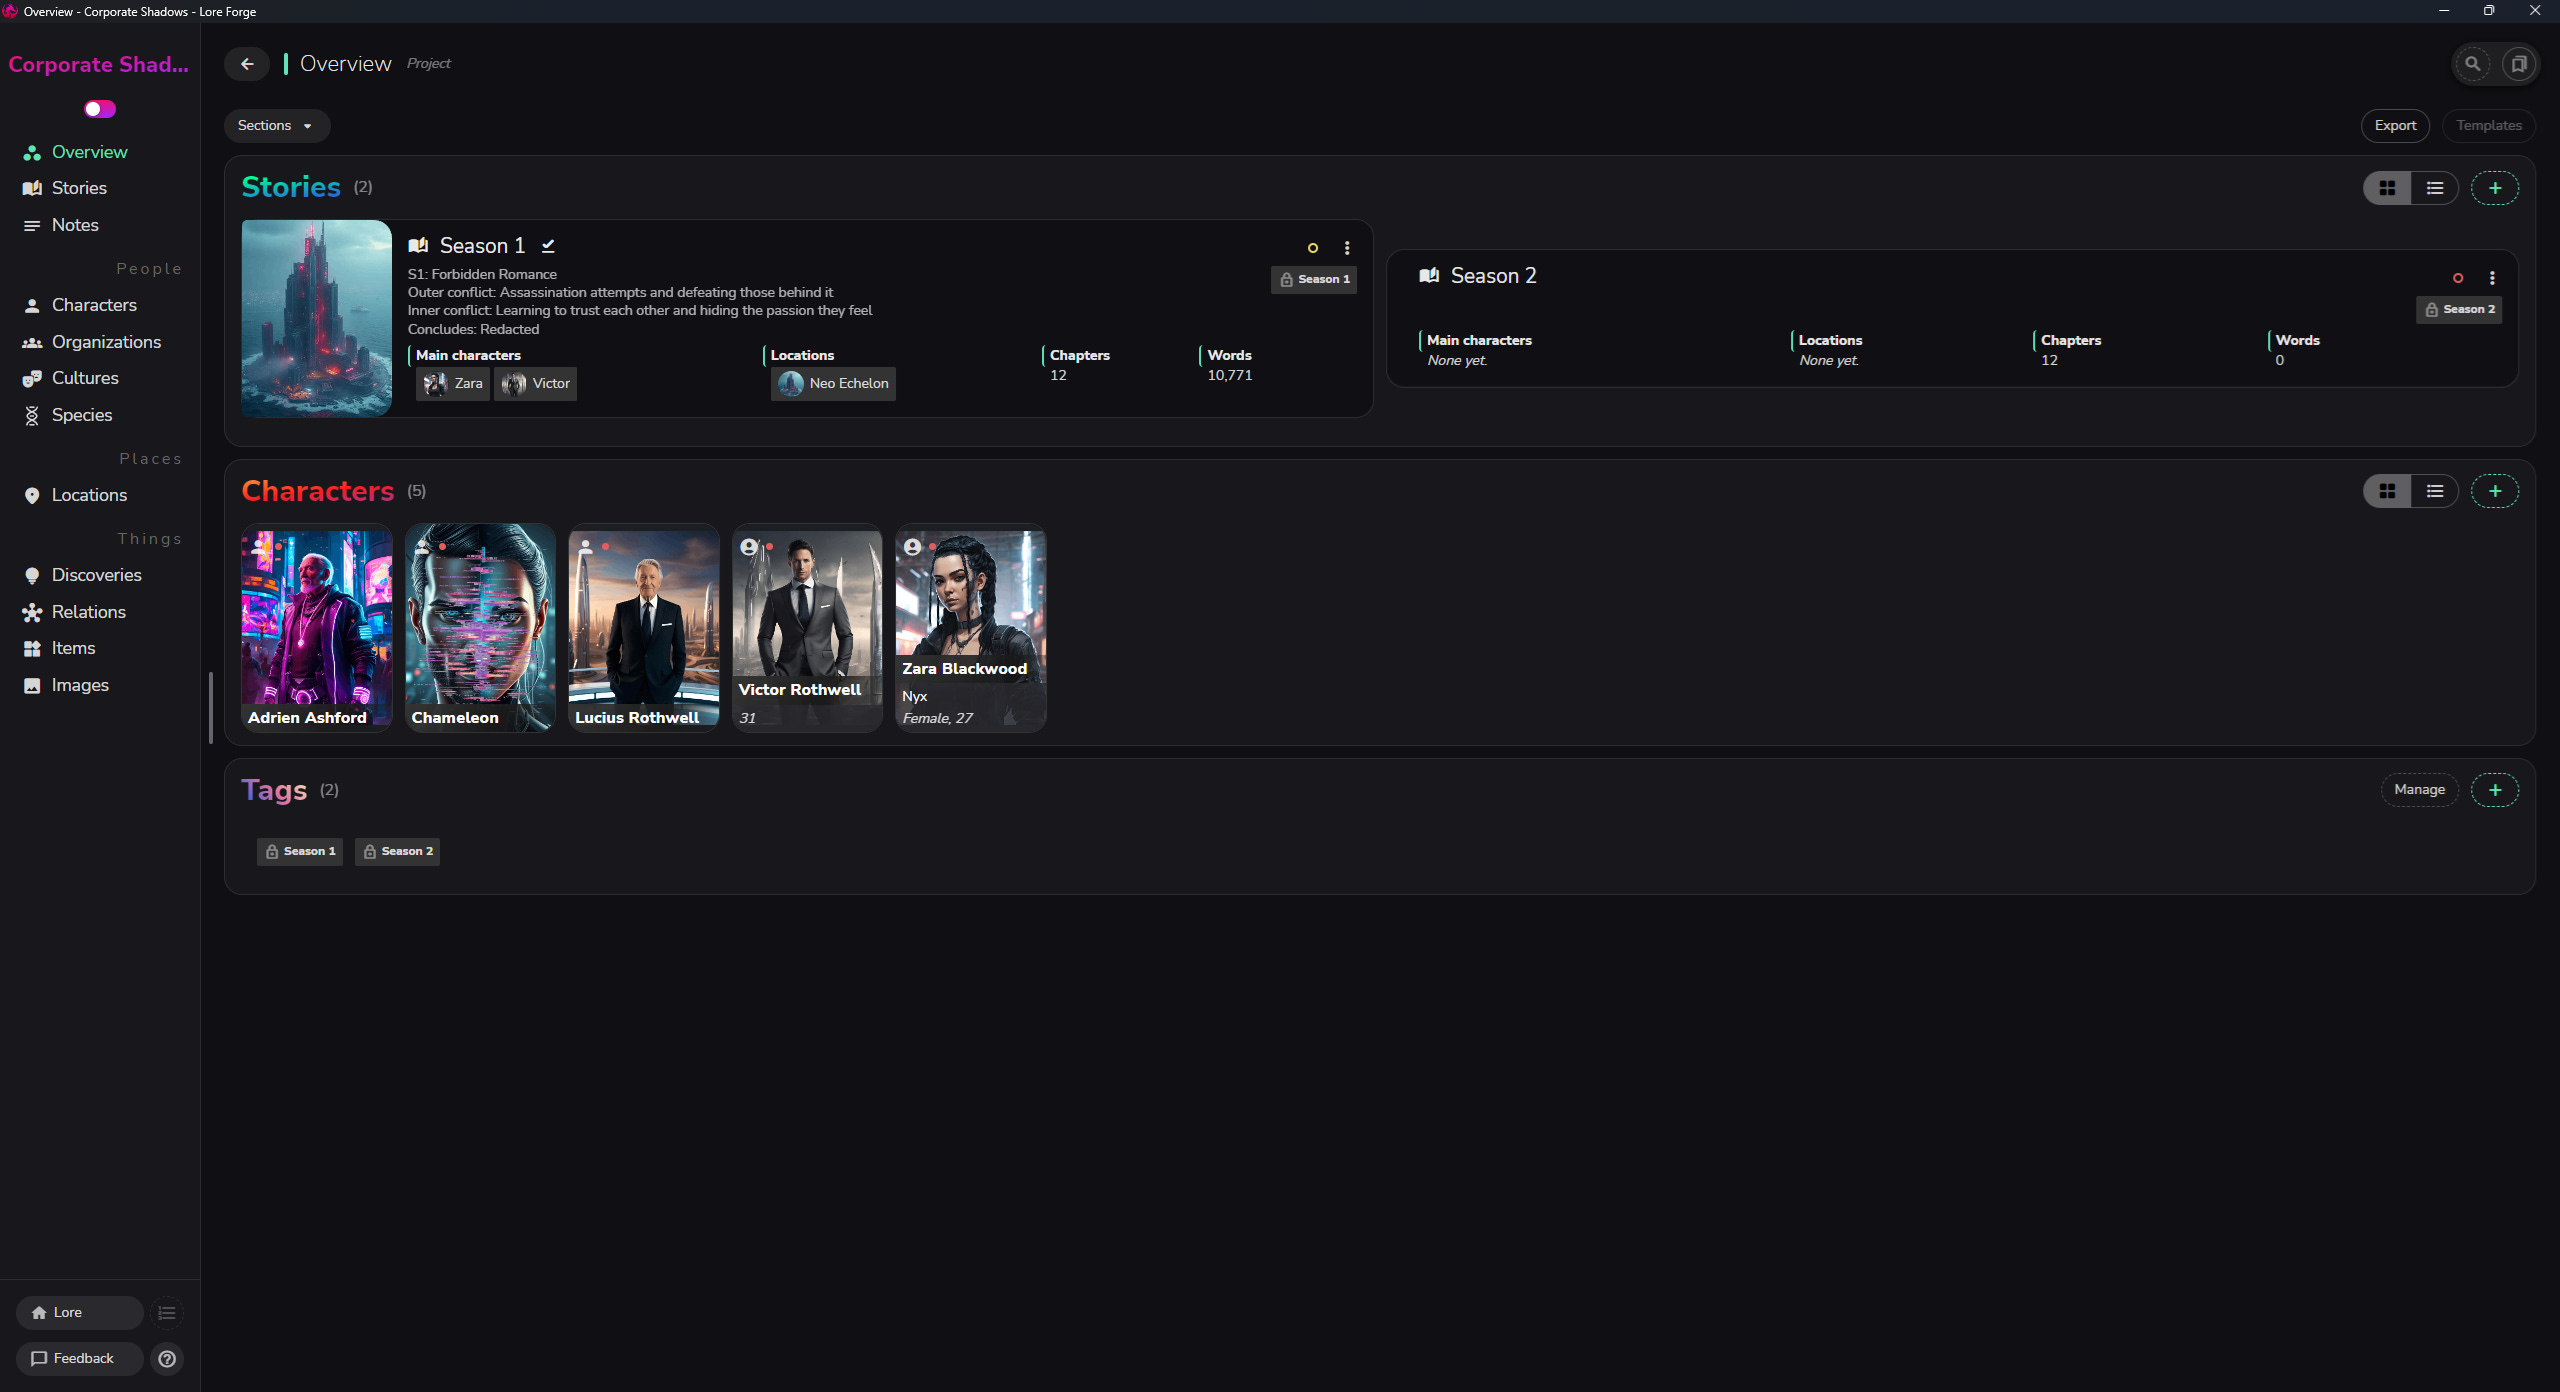
The Project Dashboard is where all the overarching planning happens. It opens on the Overview page where you can see a list of the stories this project contains, the characters, and any tags you’re using. This is a great way to get an overview of the project you’re working on.
The left banner has a number of different categories you can explore.
Overview: Where we are now, which is, as the name suggests, an overview
Stories: This just shows the stories in this project without any extra info
Notes: This is a Project specific area for Notes
There are actually two Notes sections, this one and one in the specific story. Notes that are written in one section do not appear in the other.
This initially threw me as I thought I had lost a note that I wrote. When I realised how it was organised, however, it made a lot more sense.
You can also use tags to have your notes show up across multiple stories, which is helpful when working on a series.
Under People you have:
Characters: I’ll go into further detail in this further on.
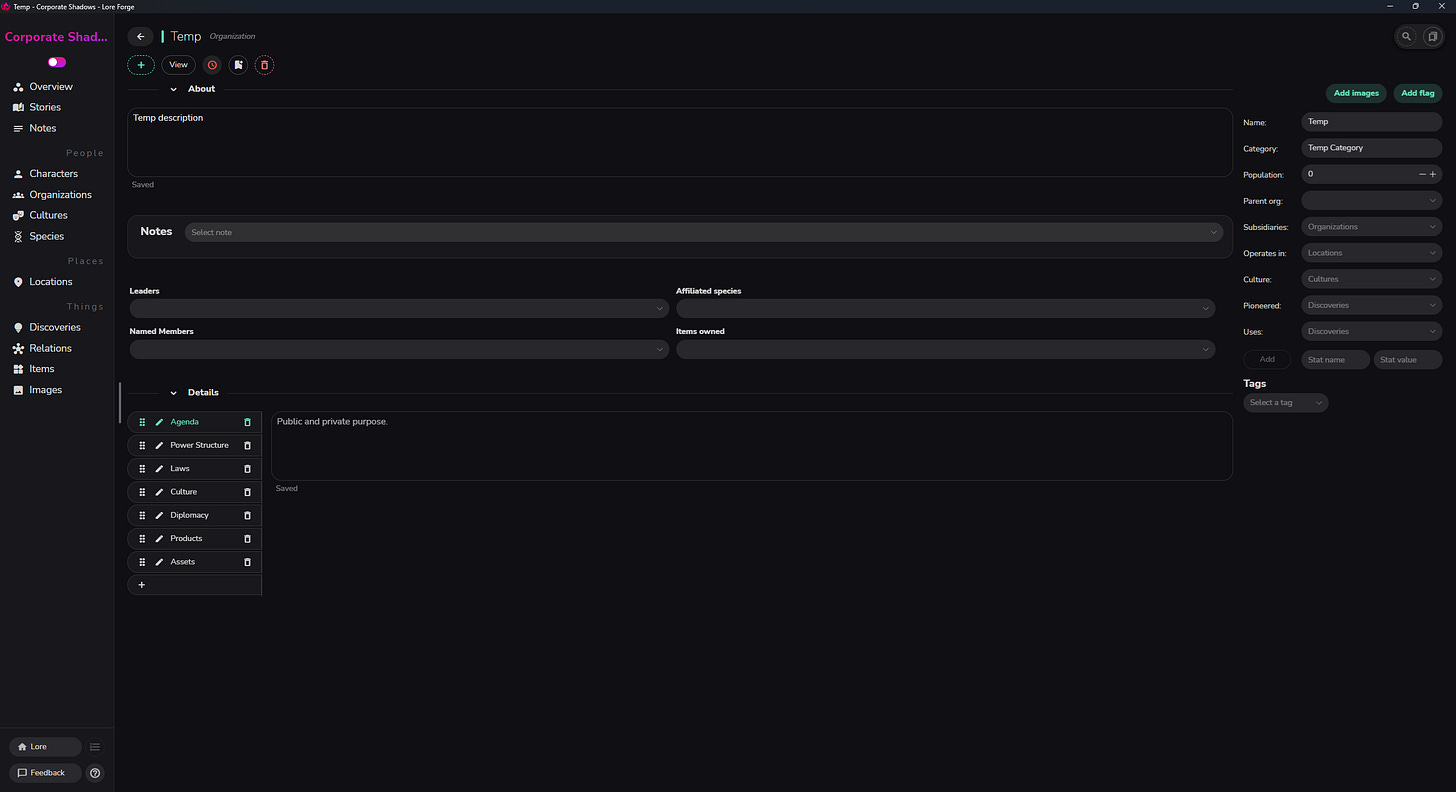
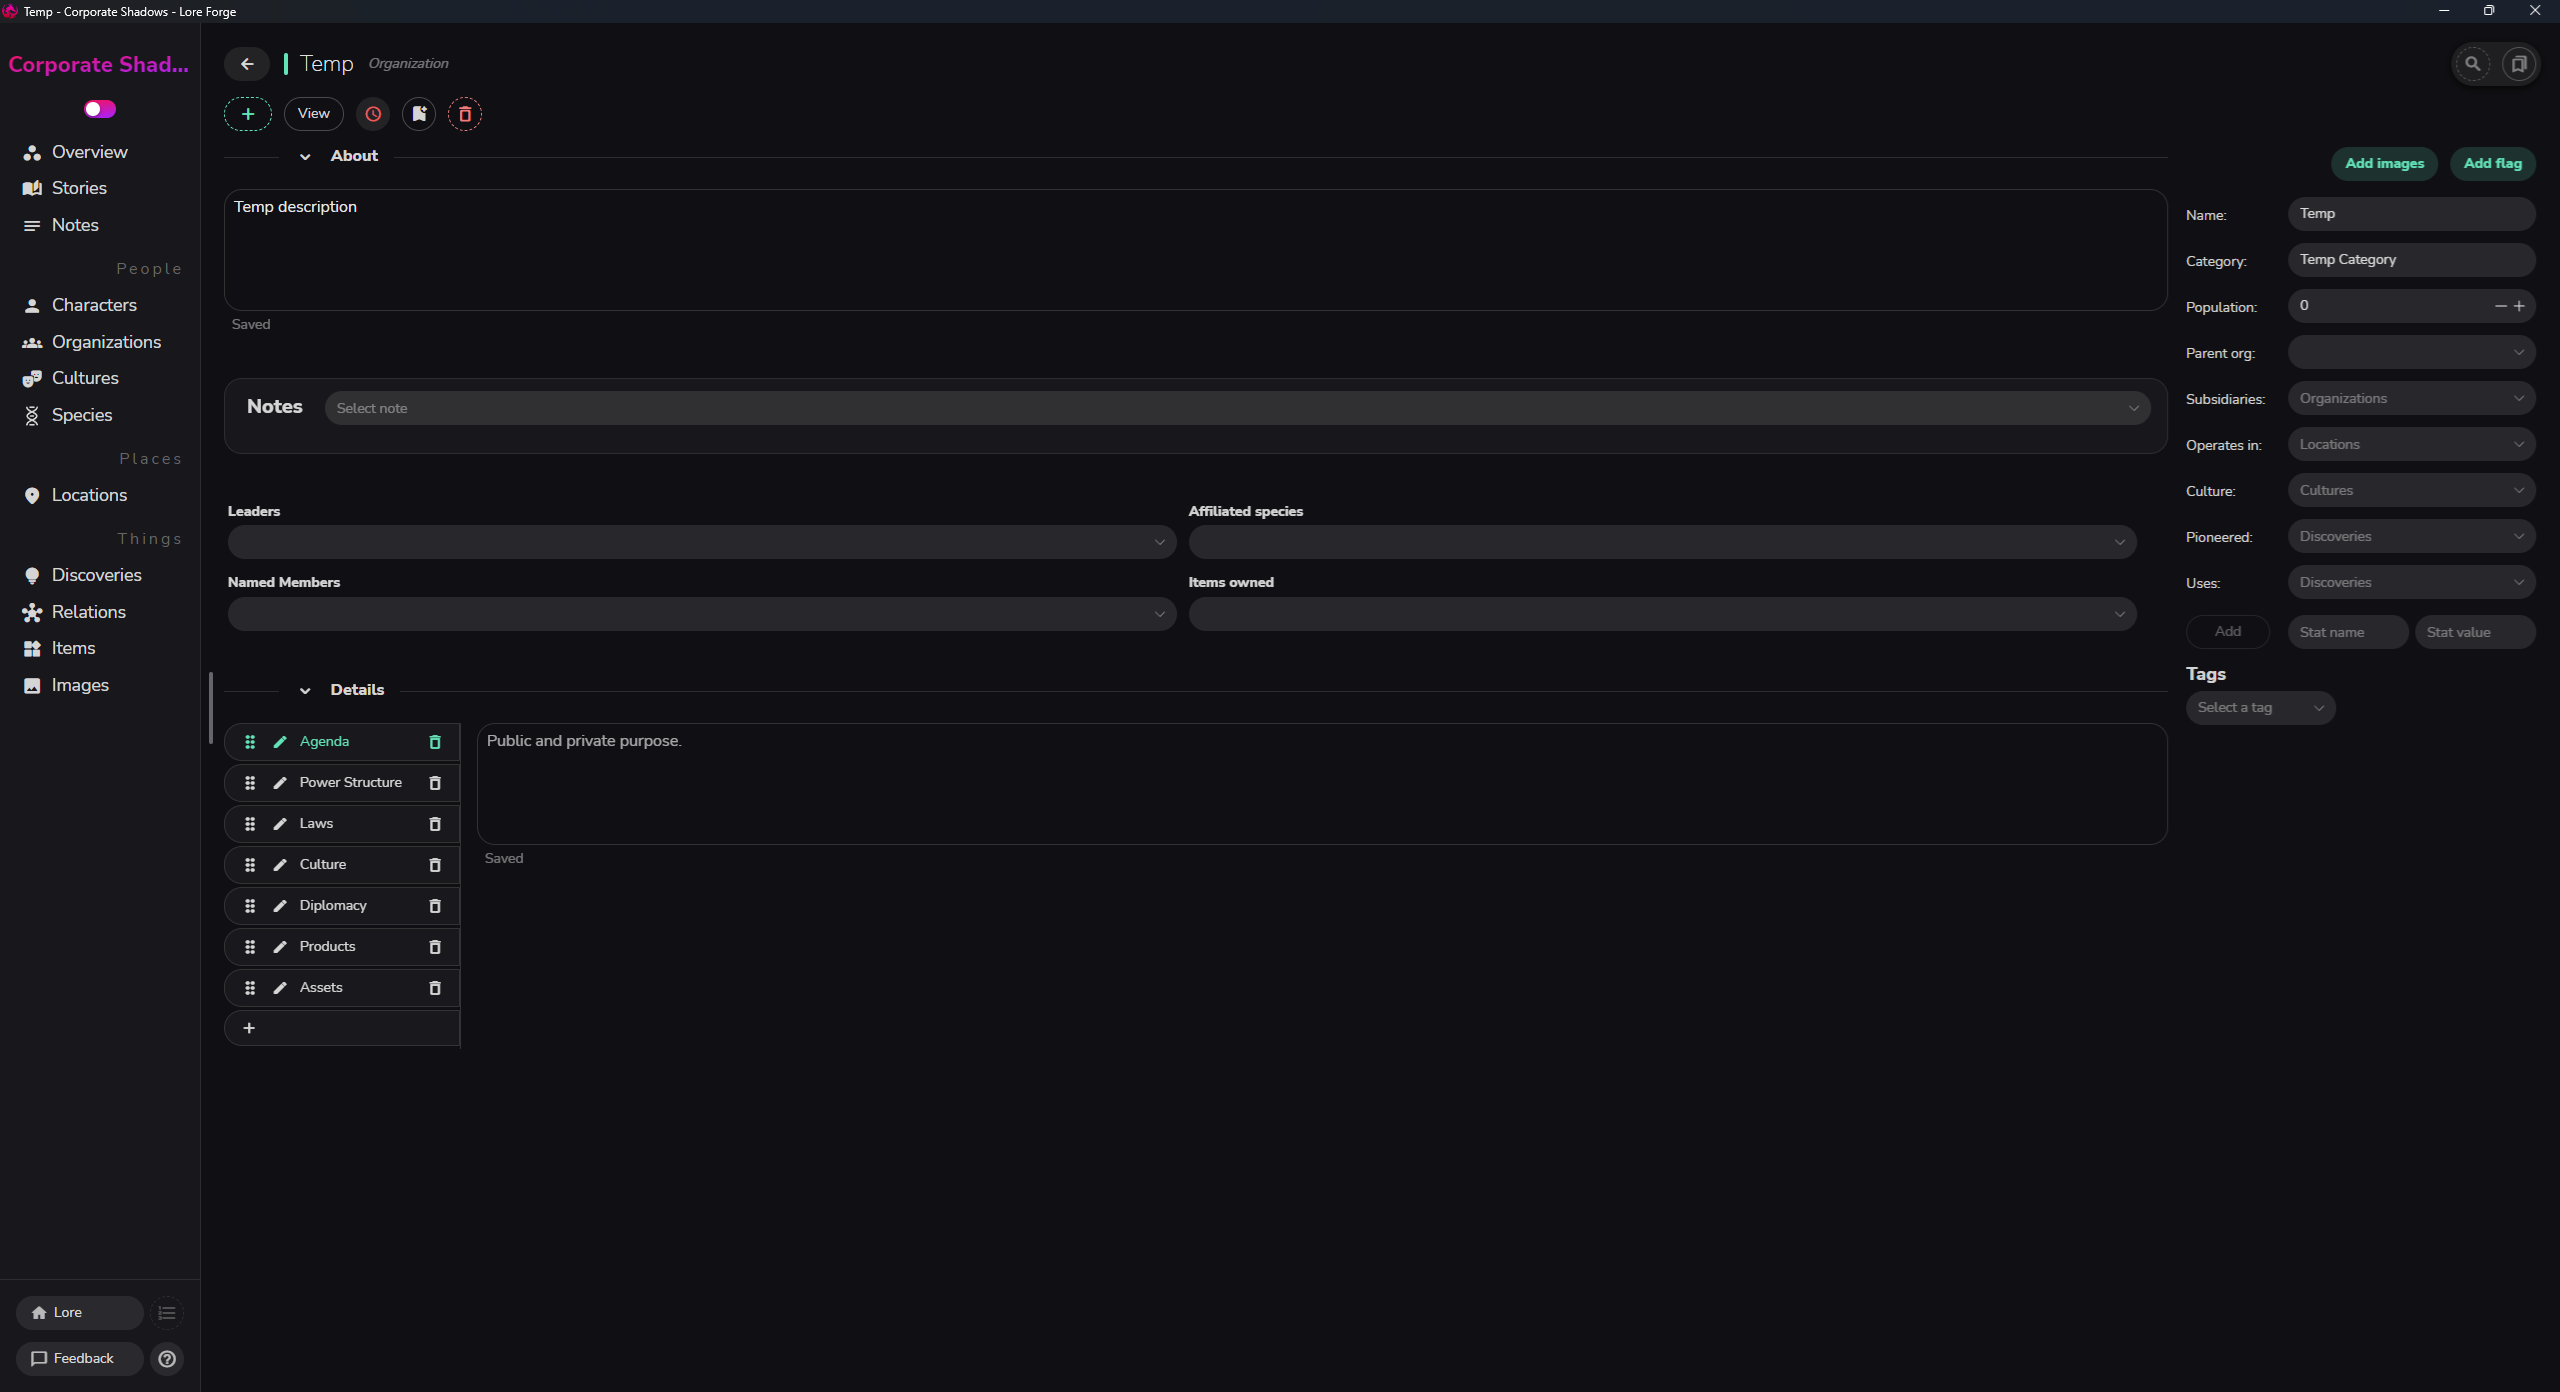
Organisations: You can create Organisations here. Creating a new one you start with Title, Category (government, religion, adventuring party, etc), and Description. From there, it shows a screen with tons of different categories for you to fill out or ignore.
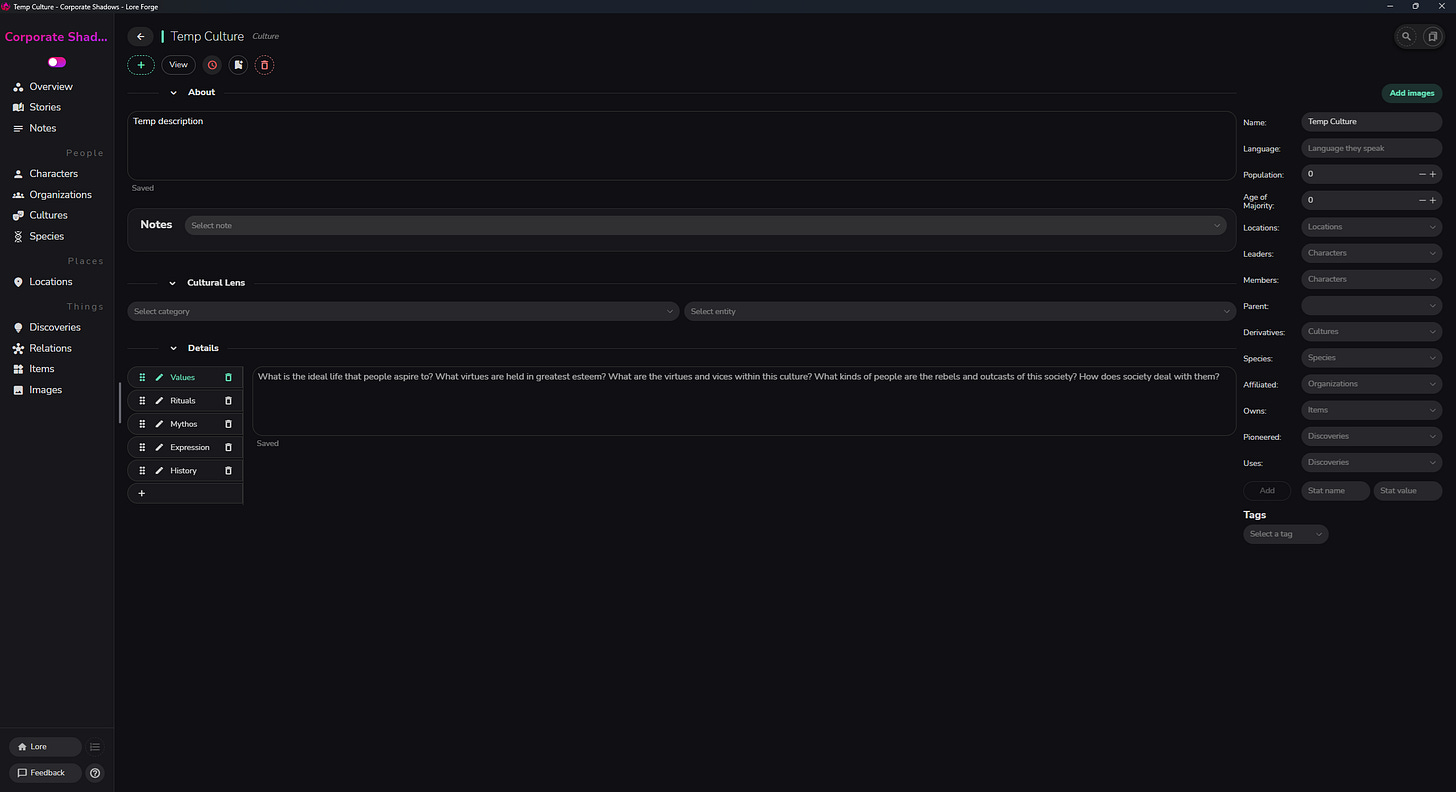
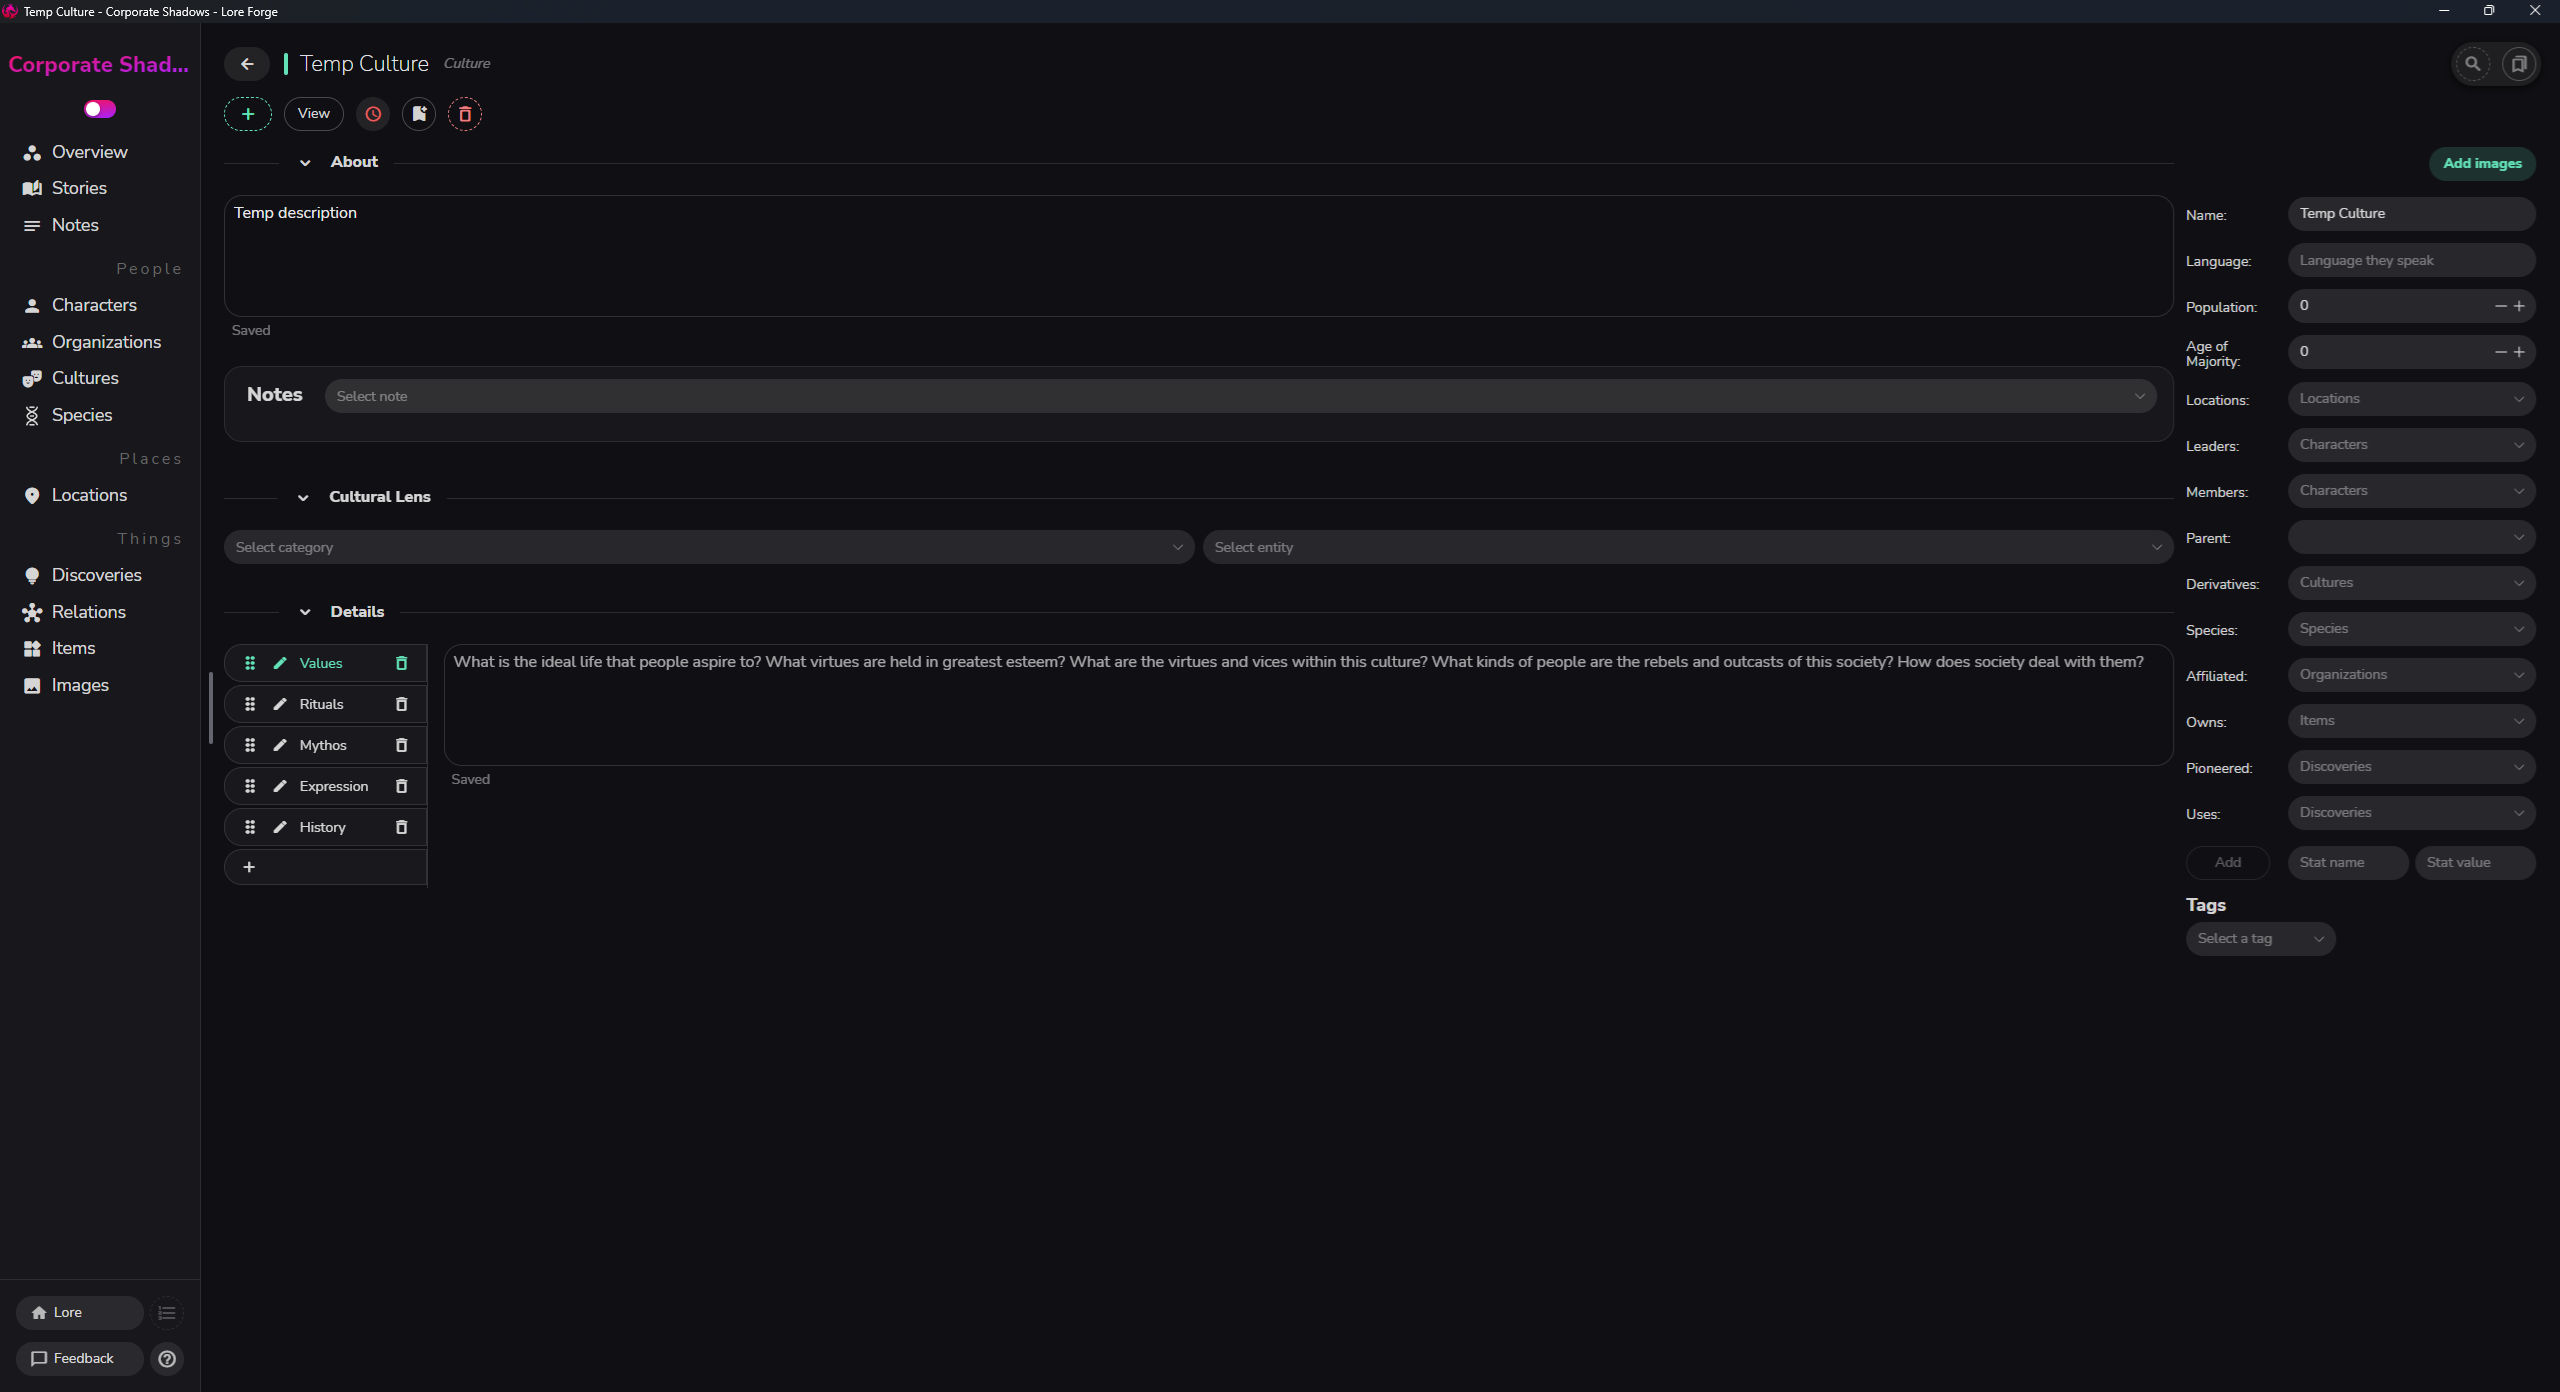
Lore Forge - Organisation Details Cultures: Much the same as Organisations, you create the title and a brief description, and you’re taken to another screen with way more information to fill out should you wish.
Lore Forge - Culture Details Species: This separates out into Sapient or Non-Sapient and otherwise works the same as the other categories.
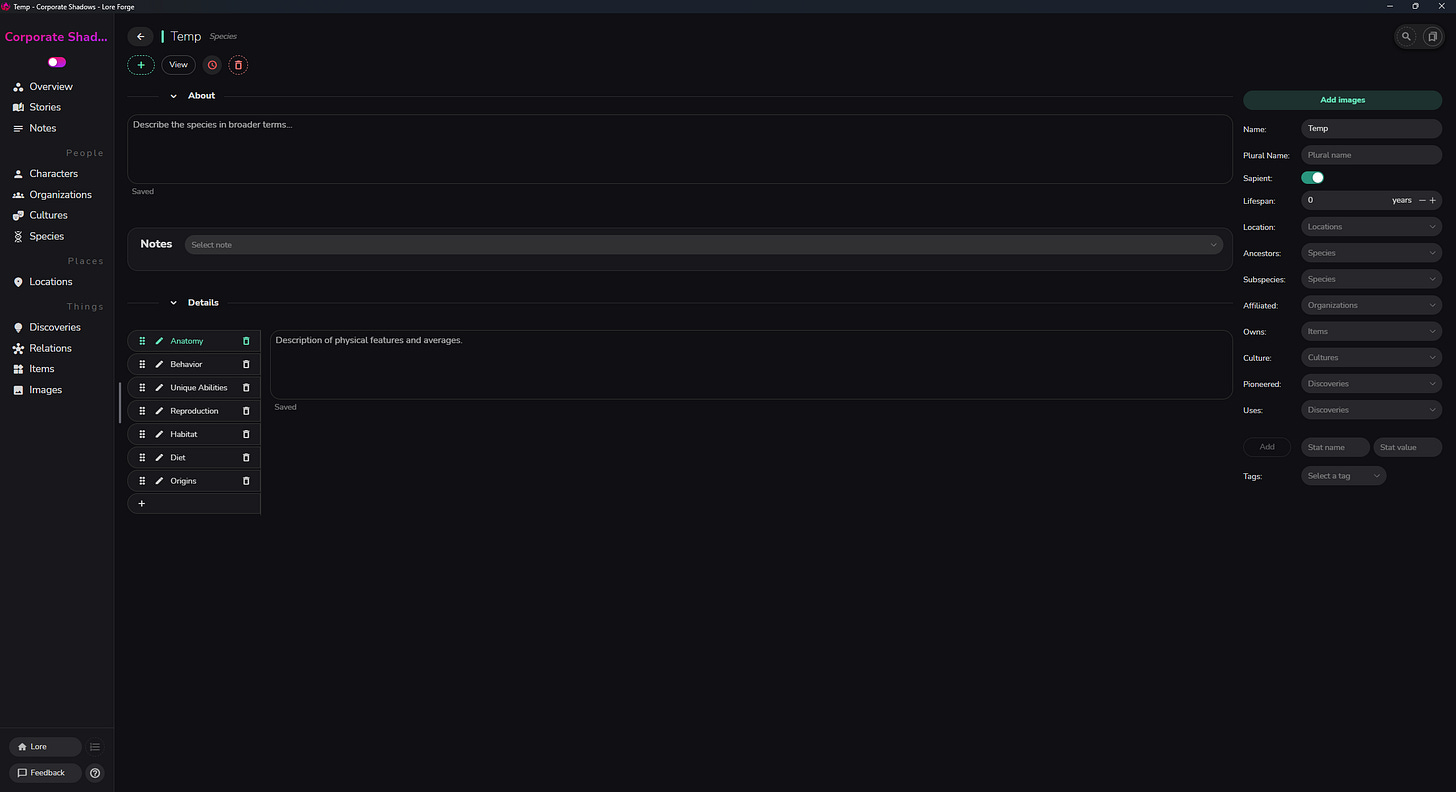
Lore Forge - Species Details

Under Places is:
Locations: The same process as above, new locations are added and, depending on how you set up your metadata in your scenes, you can see where that location shows up.
Finally, there’s the category Things:
Discoveries: I use this to record the technology I’ve come up with for the story. With my Corporate Shadows serial (read the first chapter here), the technology uses acronyms. So, to save me needing to remember them (haha!) or needing to search through the chapters to find what they were when introduced, I record them here as I create them.
Relationships: I don’t actually use this as I’m not a visual thinker, but if you like flow charts and relational data, this is the spot for you!
Items: If you have a magical object, or something of great importance to your story, you can record its details here. I don’t use this section, but if I was writing a quest based fantasy story or something with a named magical sword or whatever, this is where I’d be tracking that.
Images: This is a dump of all images used in your project, character images, location images, corporate logos, whatever you want to use.
Character Creation
So with all that, the category I most use is, you guessed it, Characters! I love a good character profile, but I’m not the kind of person who creates deep and meaningful characters before ever starting the work. I’ll usually start by creating placeholders for each of my important characters, often just tagged as FMC (female main character) or MMC (male main character) or antagonist or best friend. That is literally what their first name is when I get started.
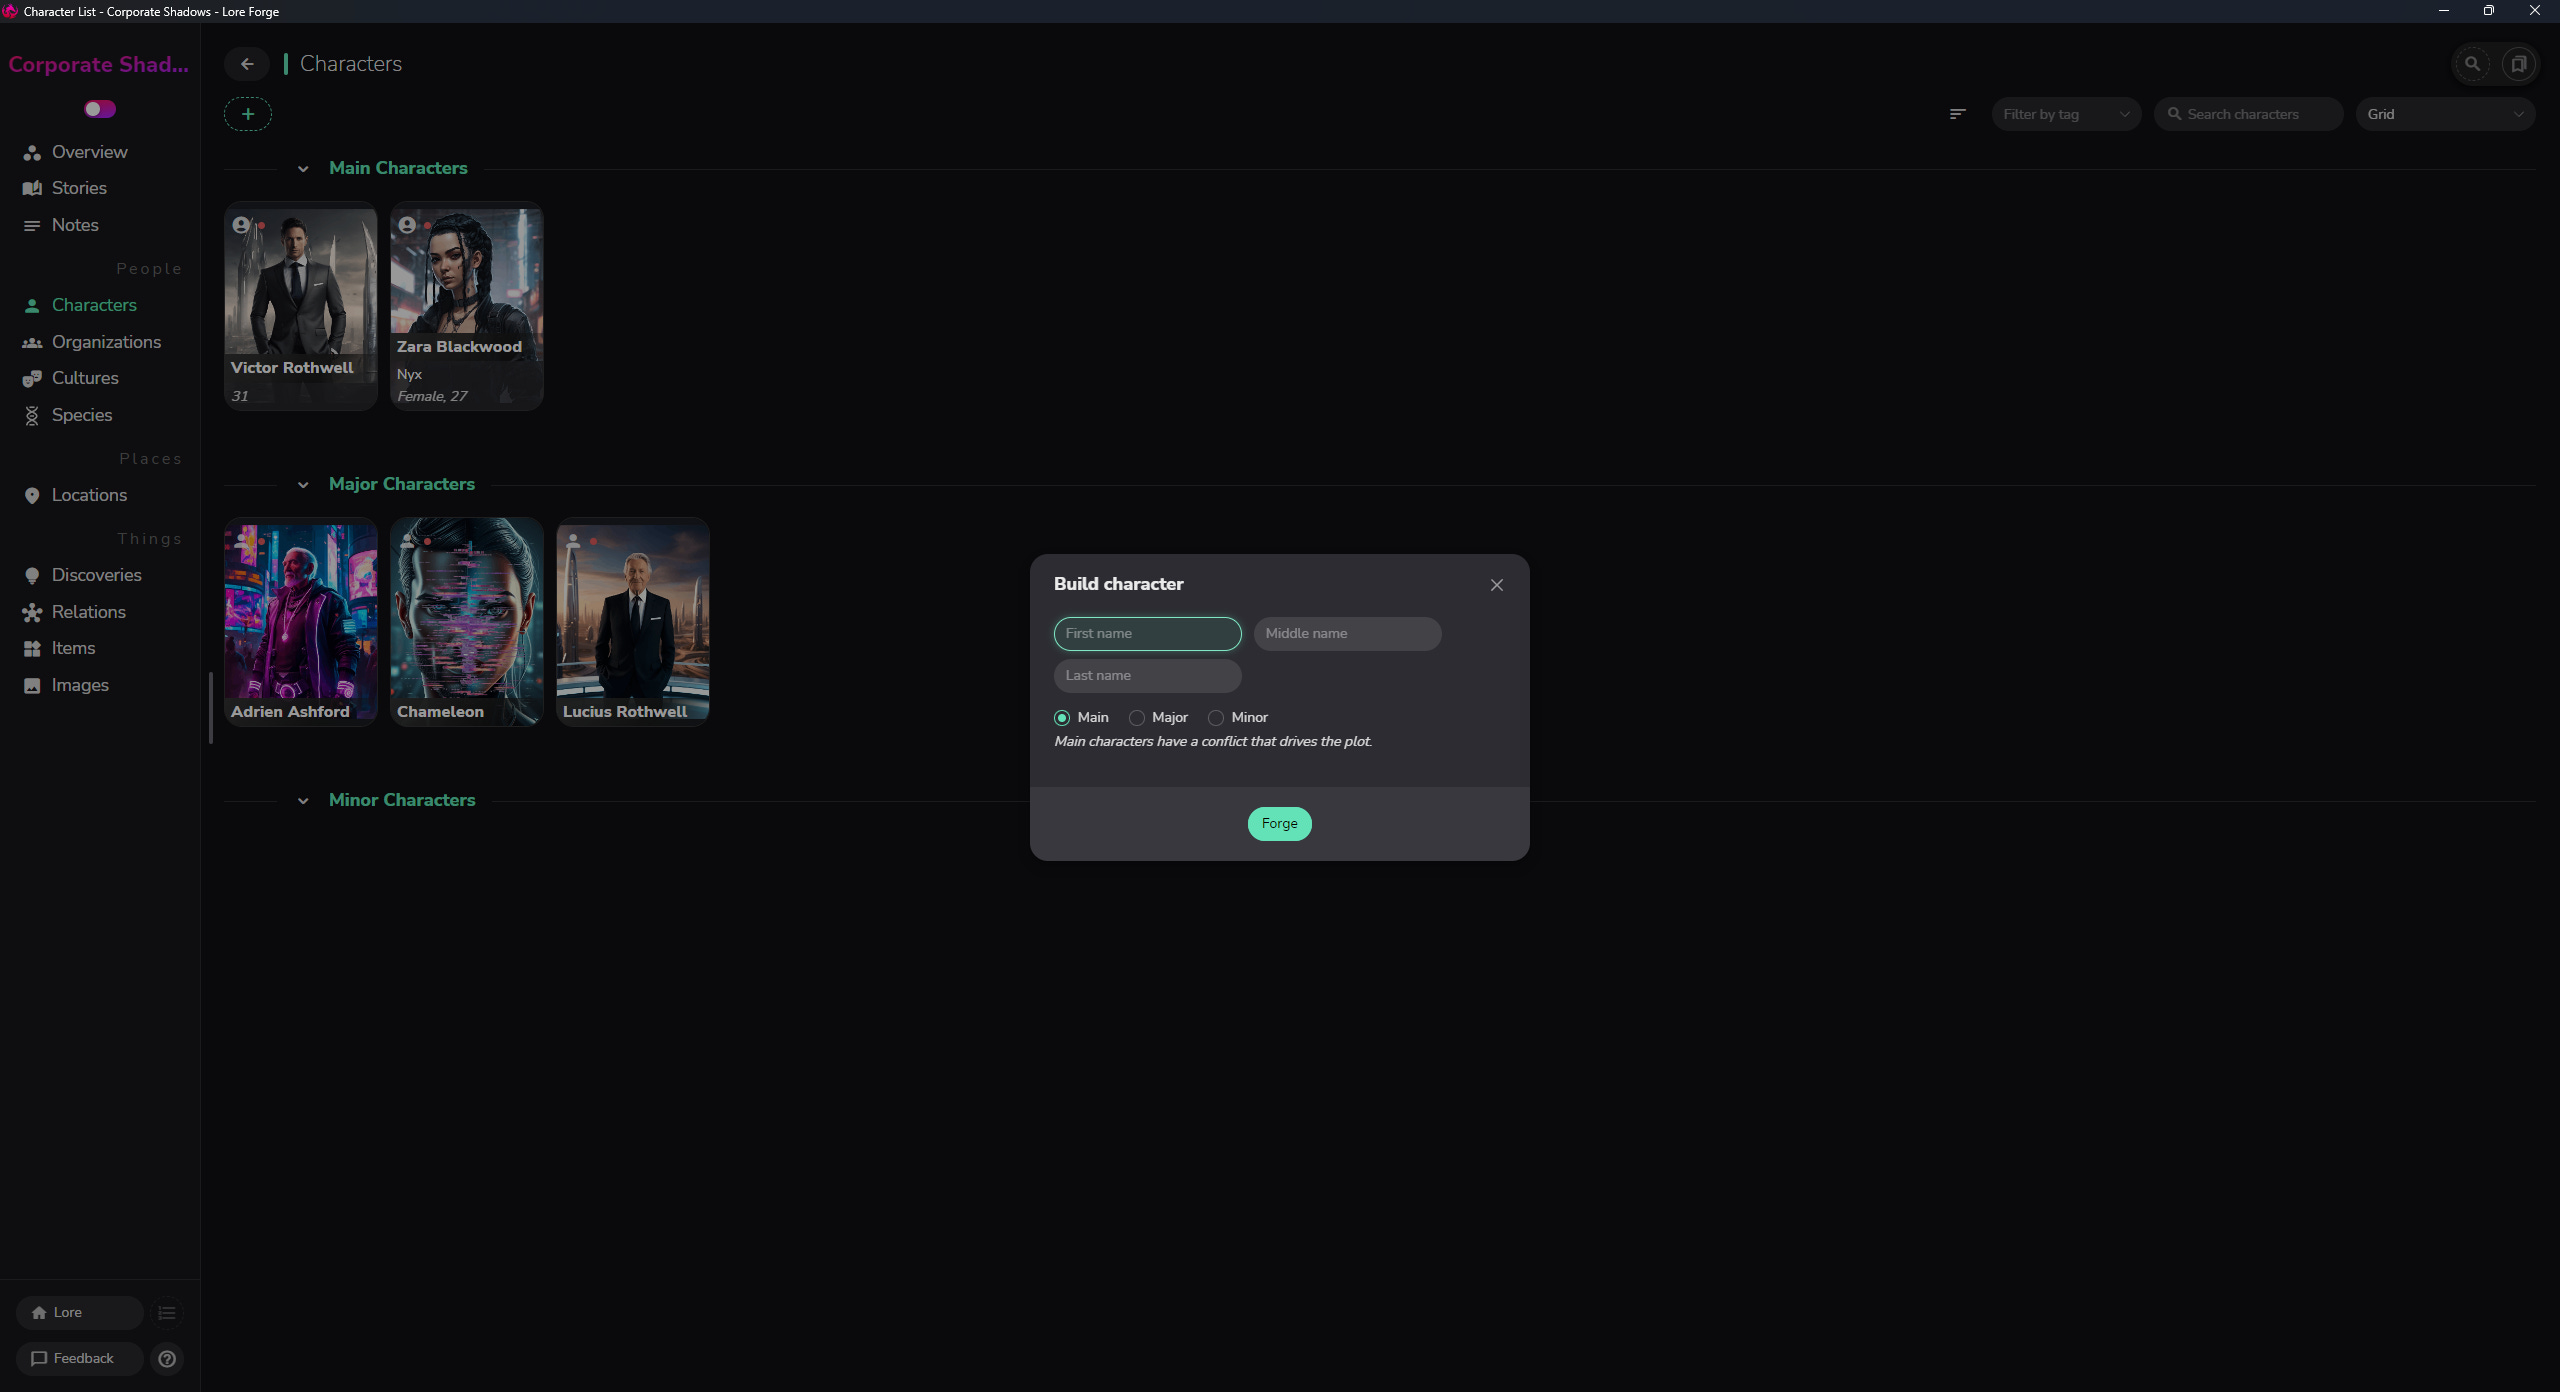
When creating a character, it first asks you the character name (you need to put at least something in one of the First, Middle, or Last name categories) and what role it plays in the story:
Main: This is a protagonist, described as “Main characters have a conflict that drives the plot.”
Major: These are important side characters or antagonists, described as “Major characters don’t have a conflict, but are useful for story development. They often accompany main characters or are running some things behind the scenes.”
Minor: These are side characters you meet in passing and have no real impact on the story, described as “Minor characters populate the world to make it feel alive and is what the main and major characters interact with during their quest.”
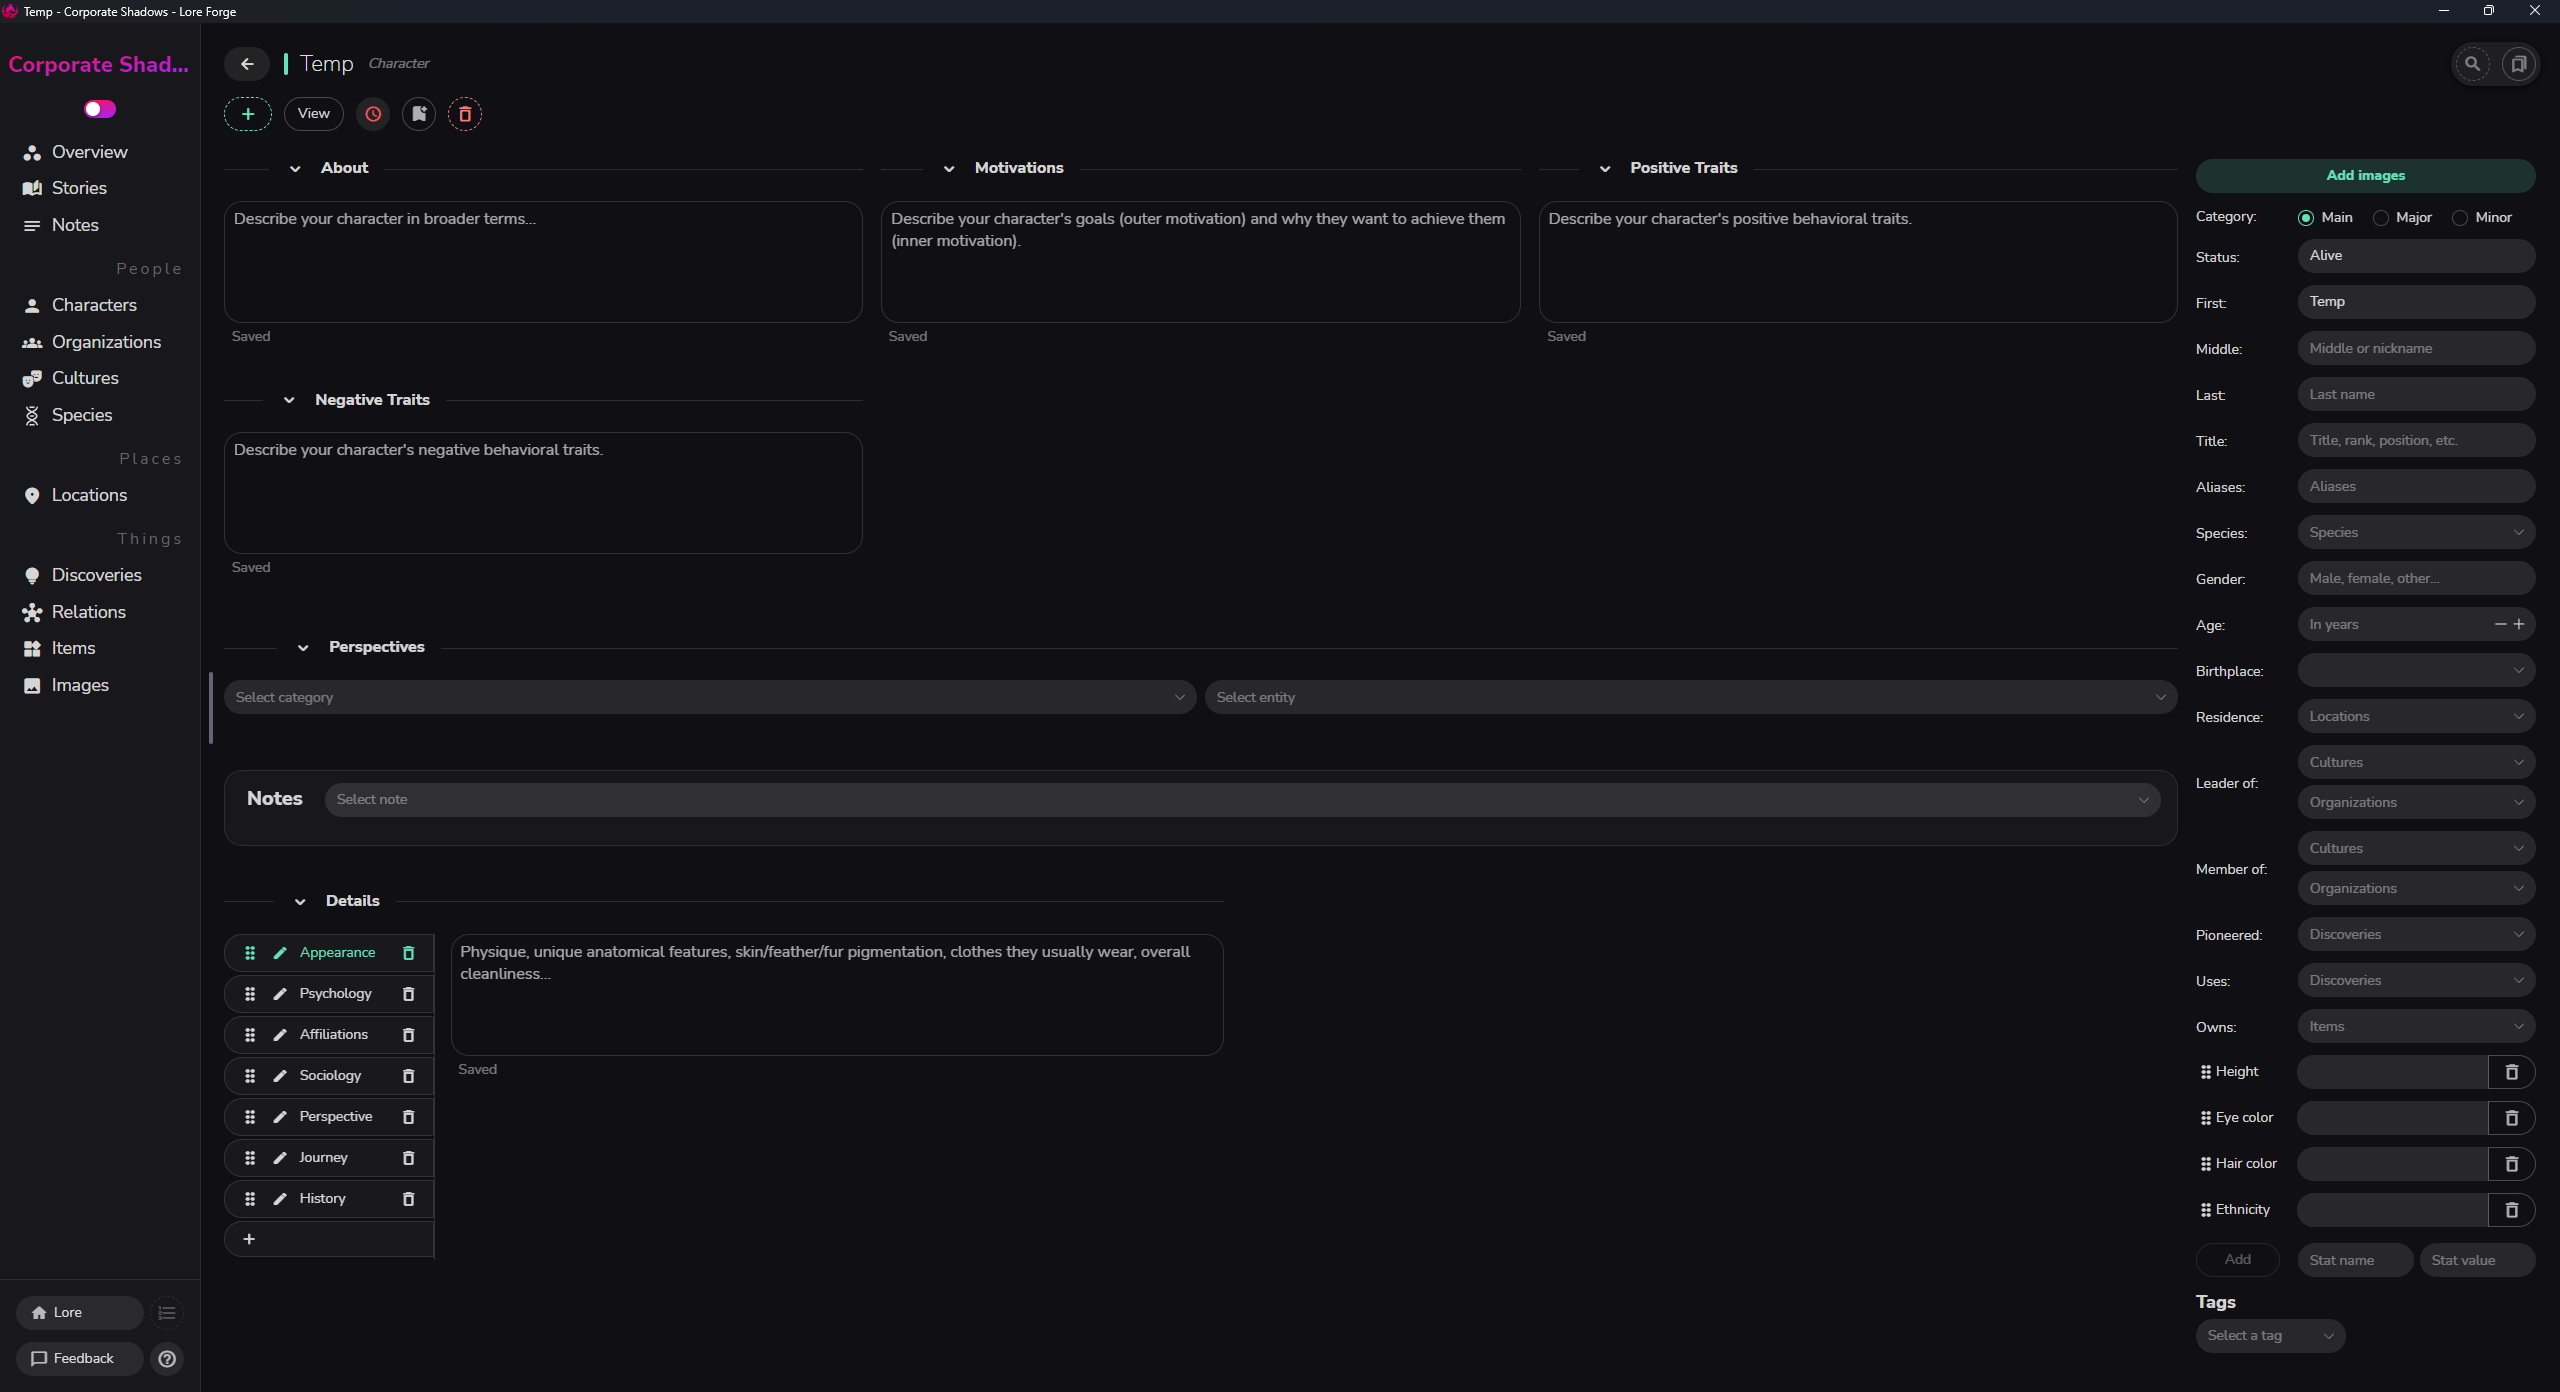
Once you’ve created a character card, you get a ton of categories and details you can add. A lot of it may not be relevant to your story (if you’re writing a modern day drama, you won’t need to fill in the ‘Species’ information), but if you just leave it blank, when you click on the character card later, it doesn’t show. This makes the card look purposeful without lots of missing information.
I generally fill this in as I write the story and the characters tell me details about their lives. The main adjustments I make, is I create extra categories for Enneagram Type, Desire, Fear, Misbelief. These four aspects I tend to work out before starting the story, and the rest comes as I write it. But you can be as detailed or sparse as you like, whatever works best for you.
Story Dashboard
Now we move over to the second dashboard, the story specific dashboard. If you haven’t already done so, you’ll need to click on a story to select it. If you have, you can switch between the two by the little toggle at the top left hand of the screen.
Here you’ve got:
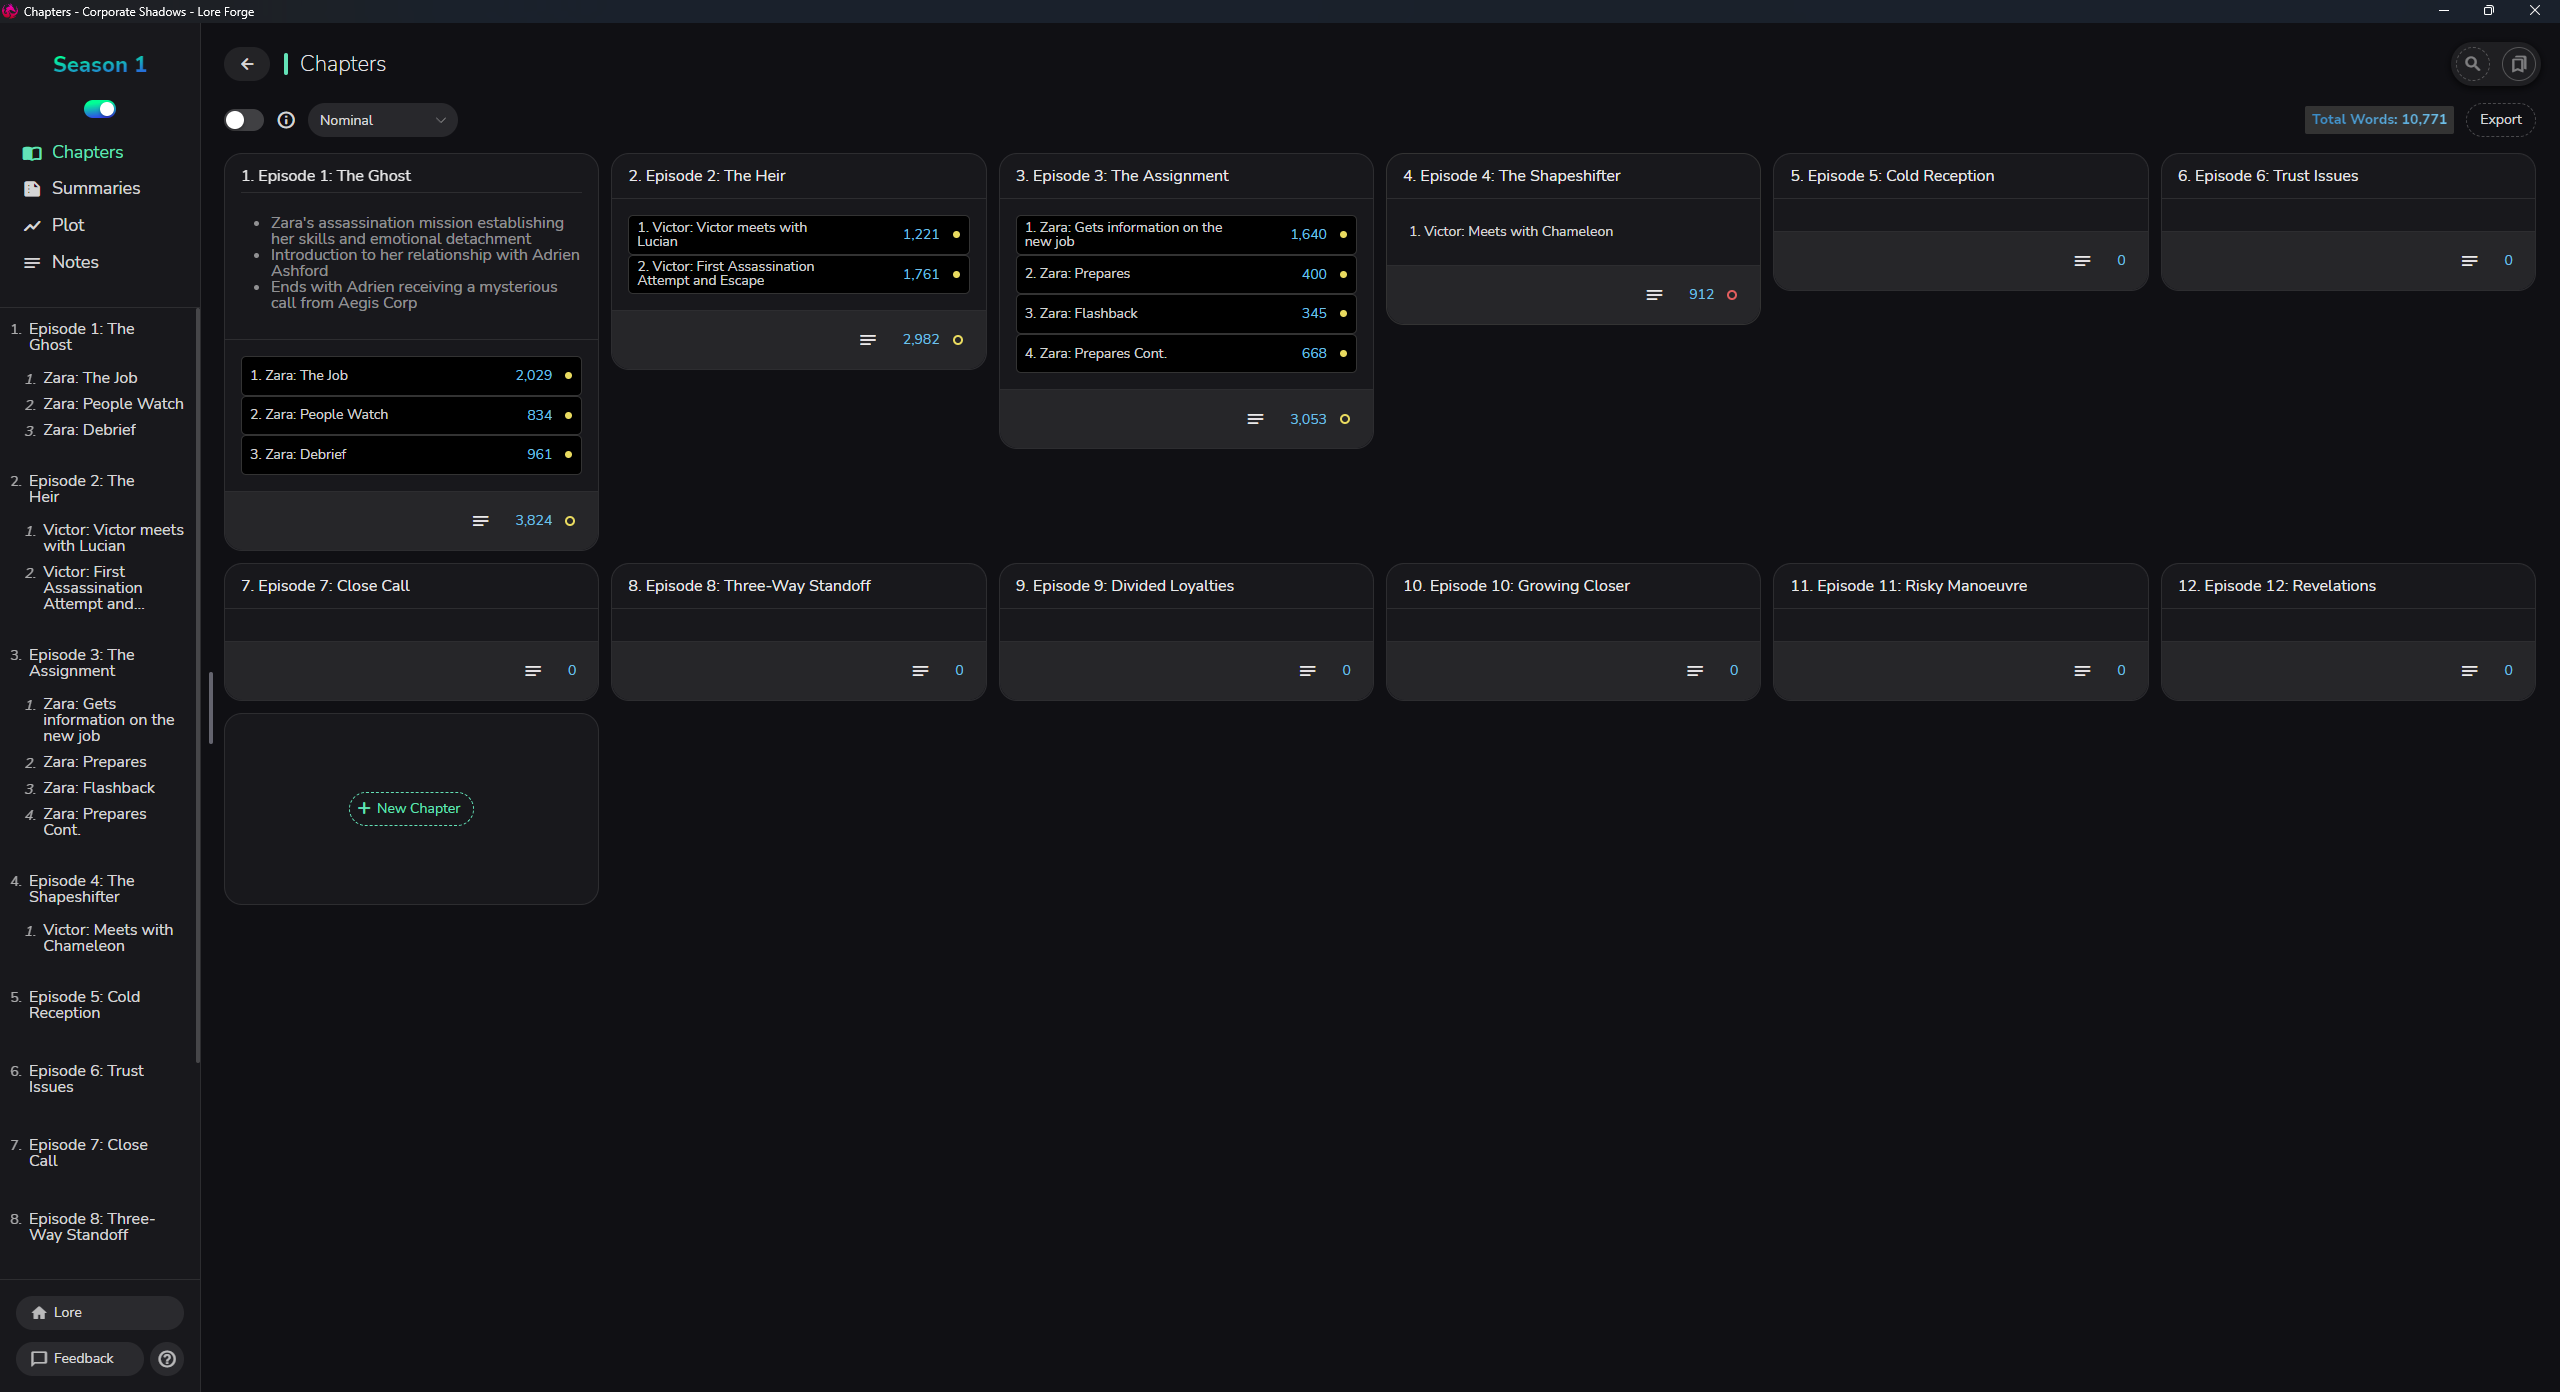
Chapters: A list of chapters and the scenes contained within.
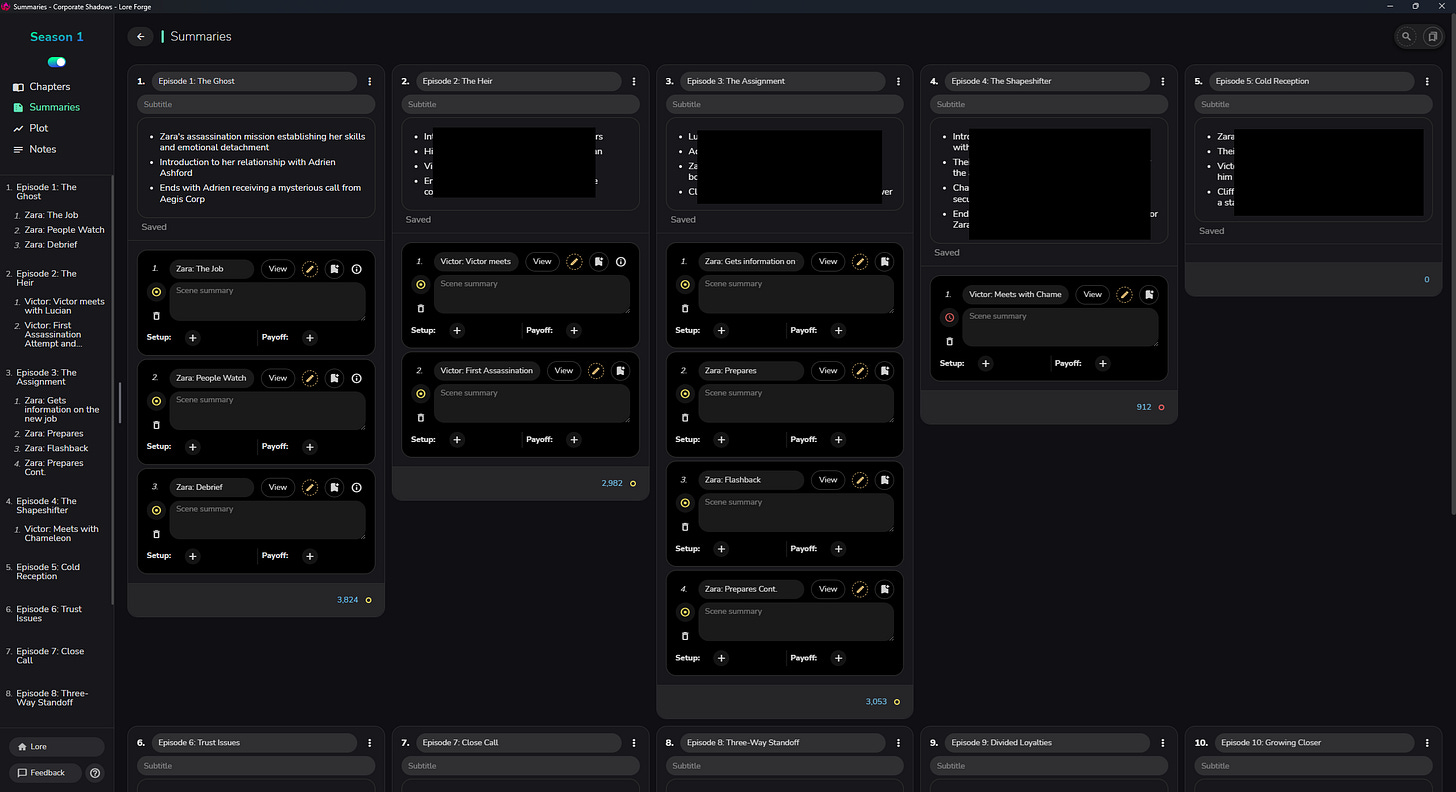
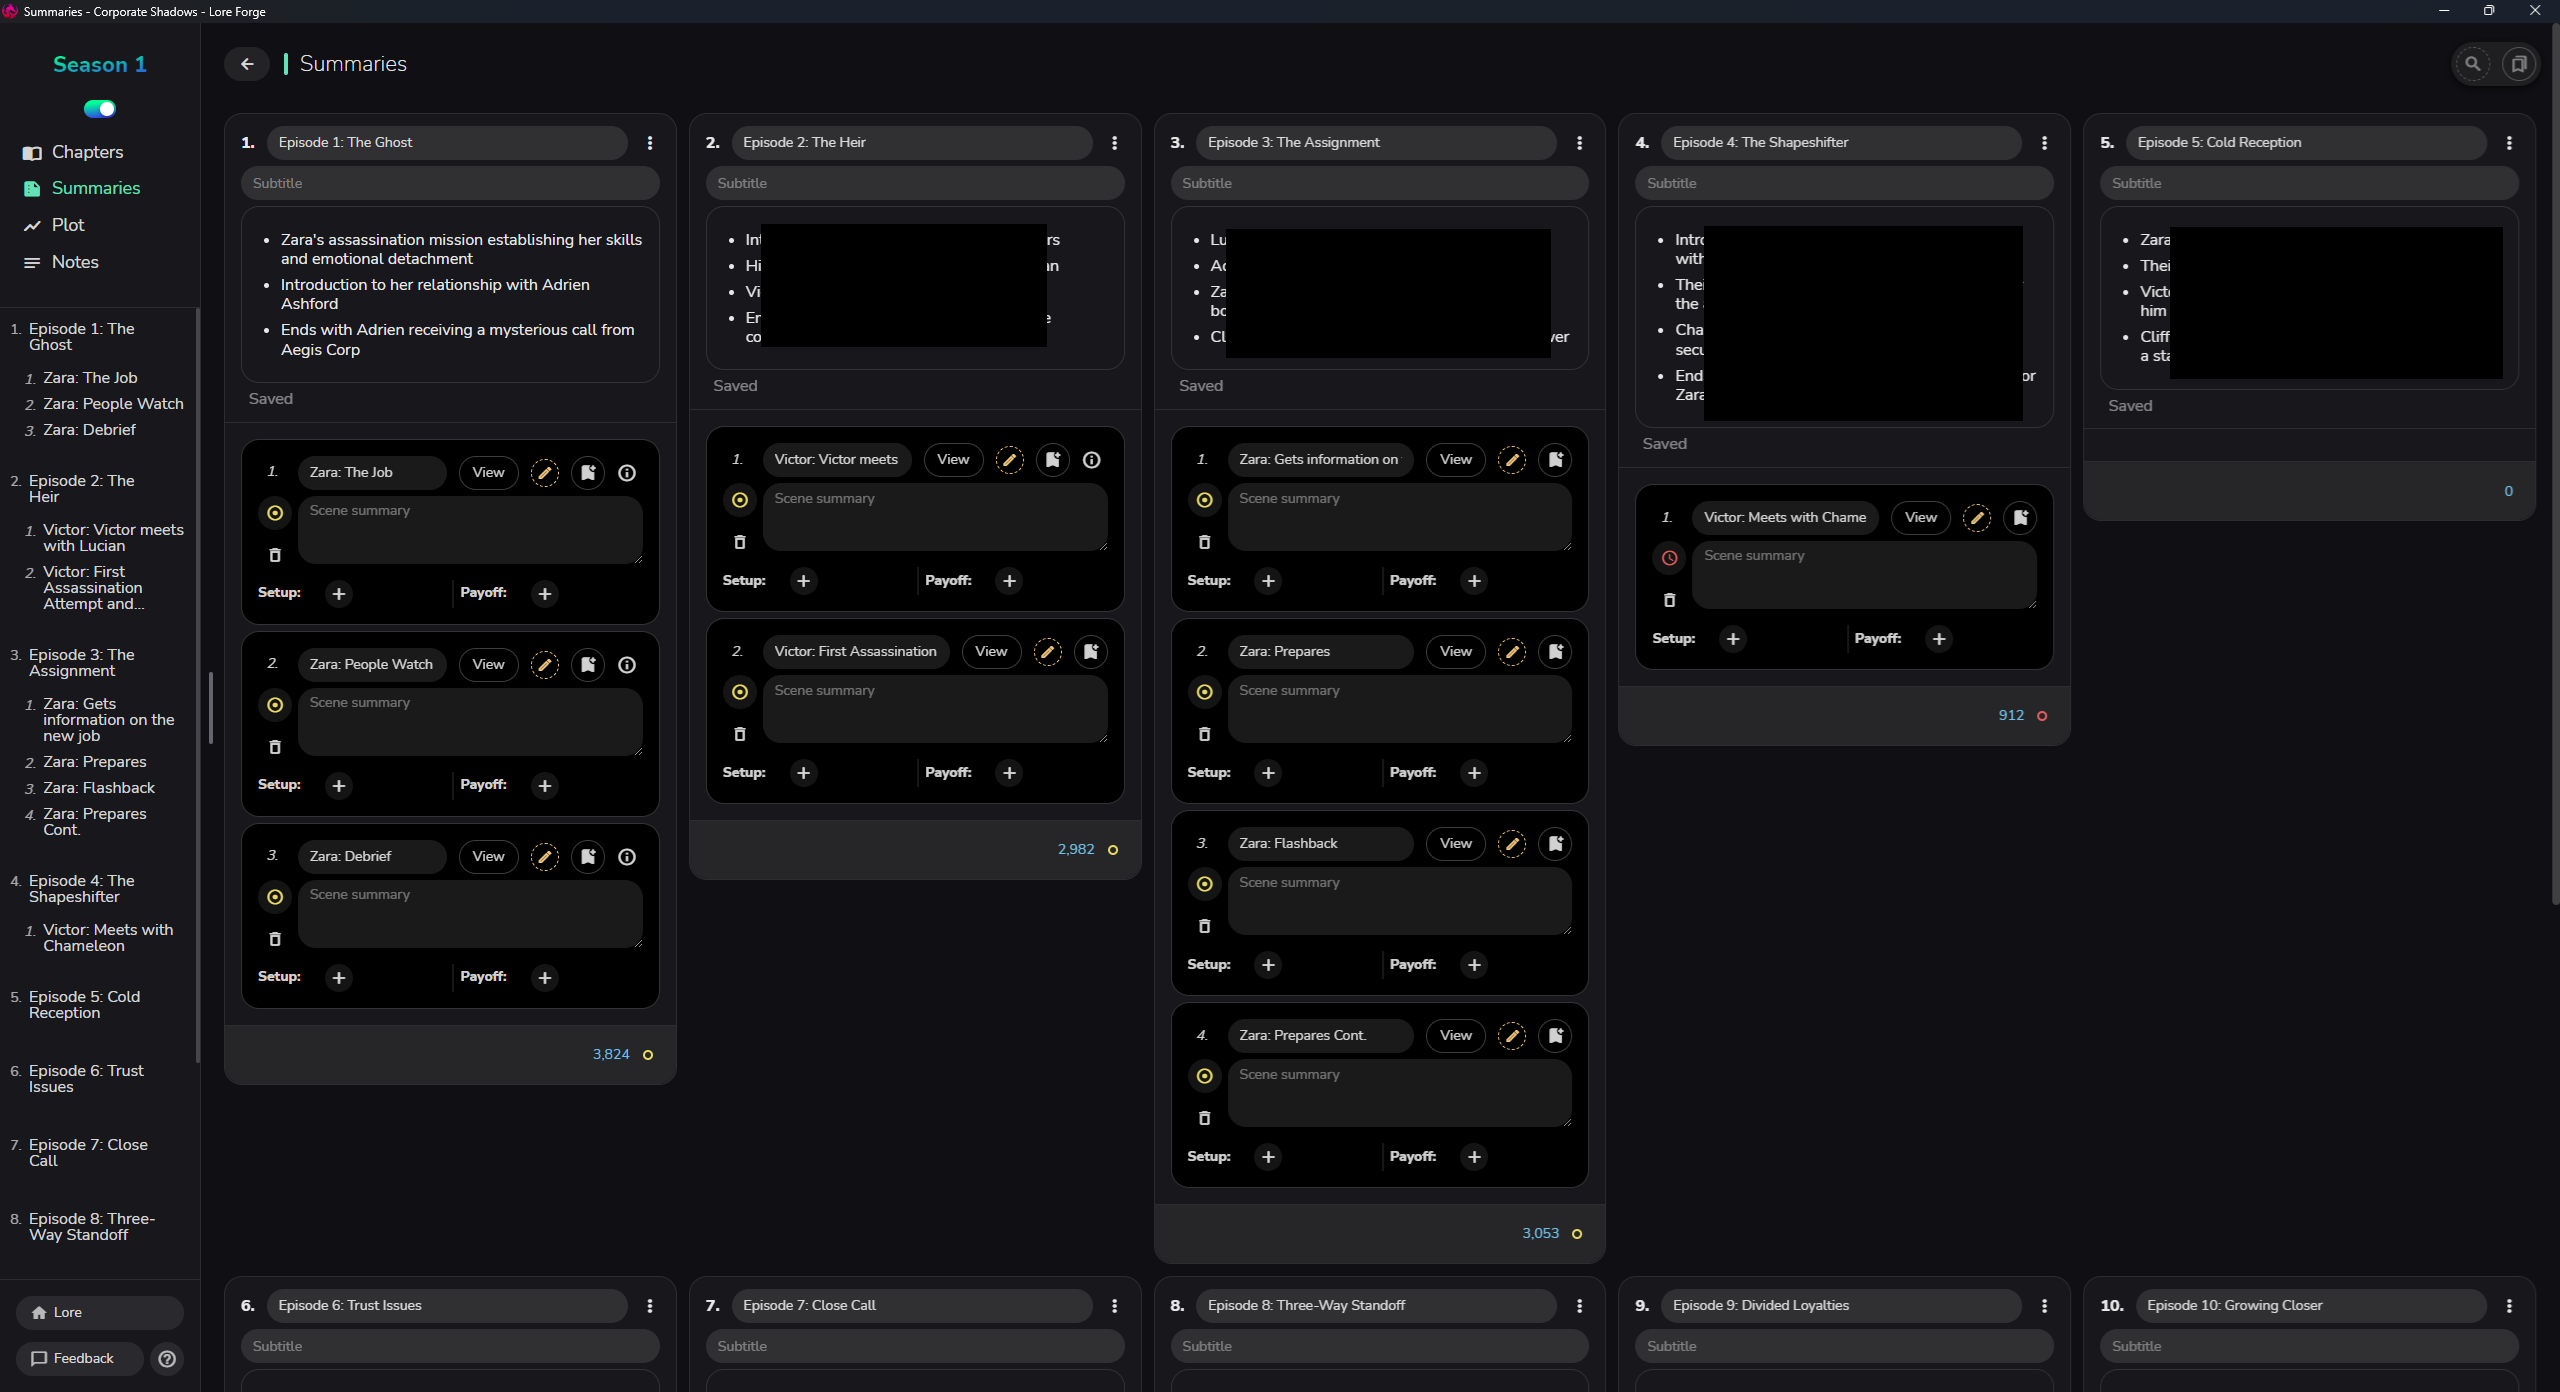
Summaries: This is a drag and drop of the chapters and scenes, similar to Scrivener’s cork board.
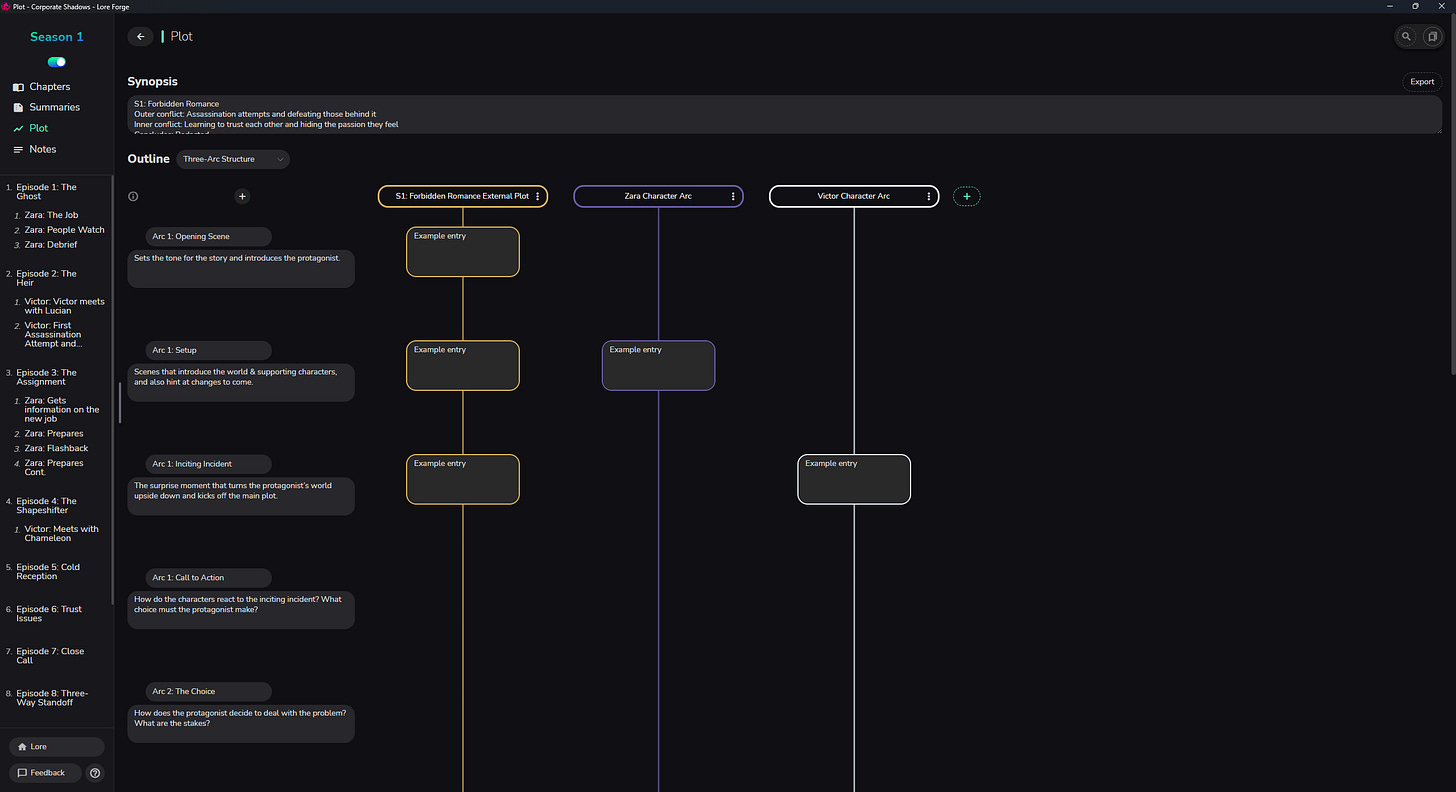
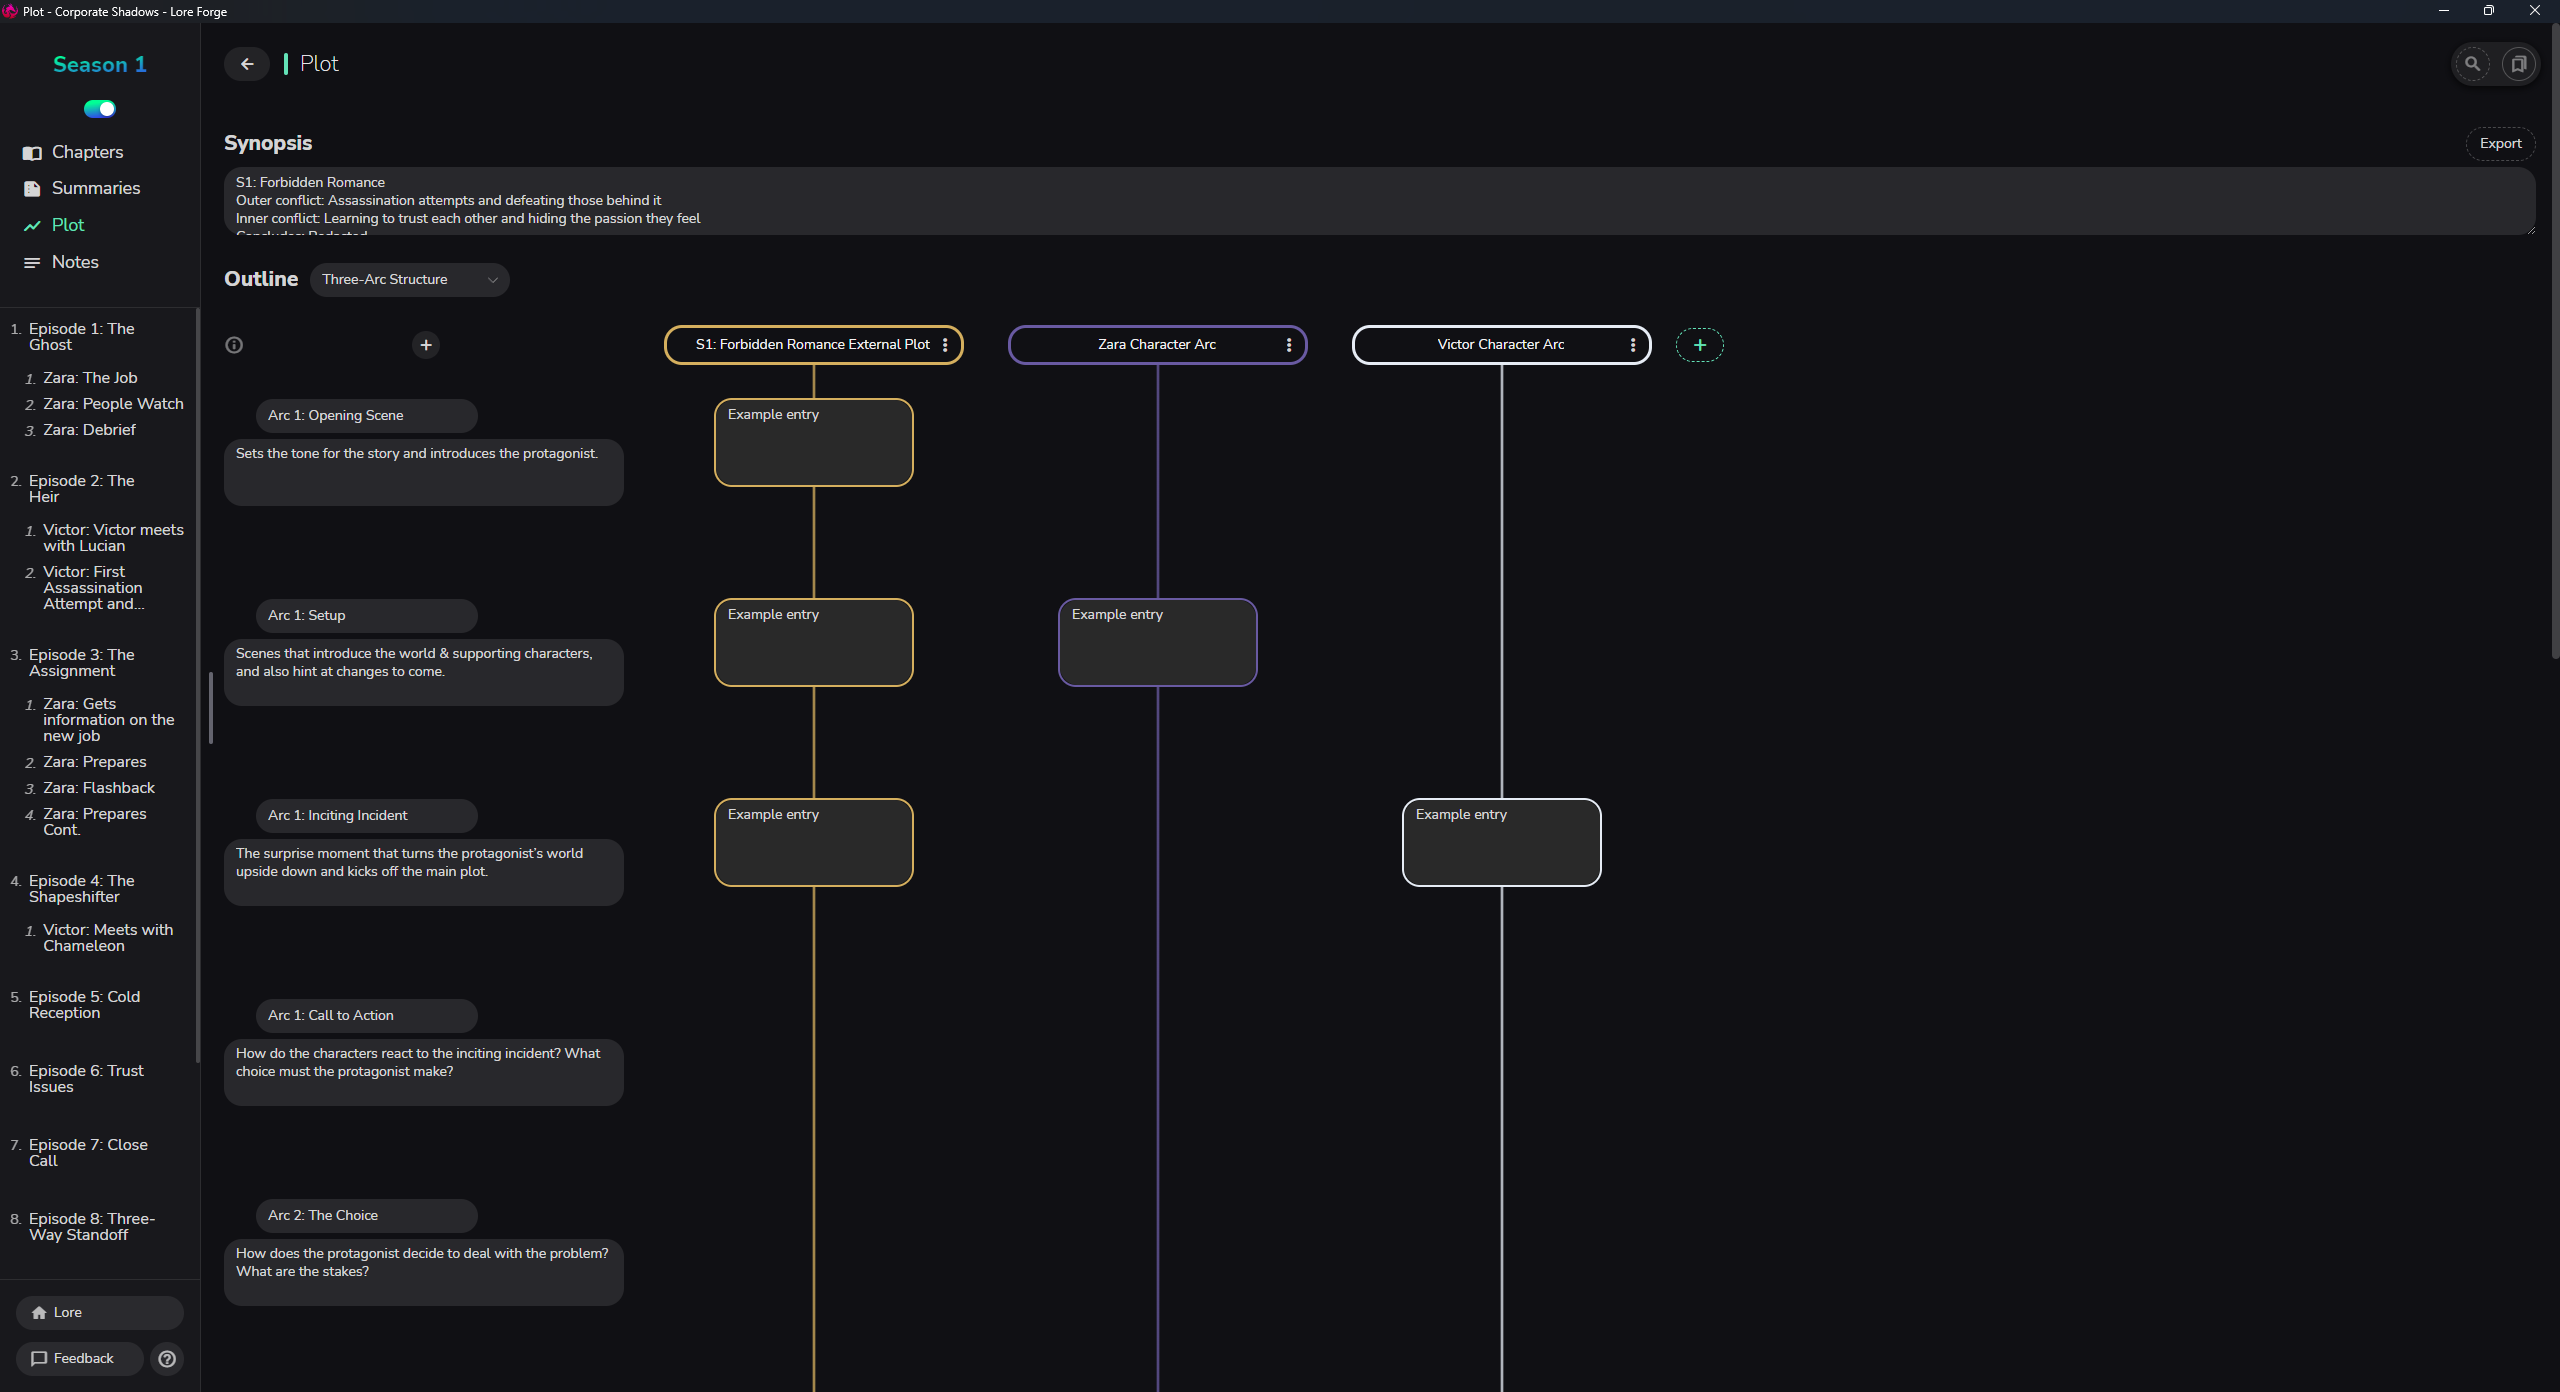
Lore Forge - Summaries Plot: This part is really cool. You can select from any number of plot structures, from the three act structure, to Save the Cat (check out my Save the Cat Breakdown Series here), to some I’ve never even heard of. You then have a line for each of your plot arcs, and you fill in each of the sections accordingly. For example, I tend to have an External Plot arc for the things that happen on the outside to the characters (an assassination attempt, for example), and one for each major character to track their internal character arc.
Lore Forge - Plot Then a list of the chapters and scenes so you can easily click between them to jump around your story.
The Editor
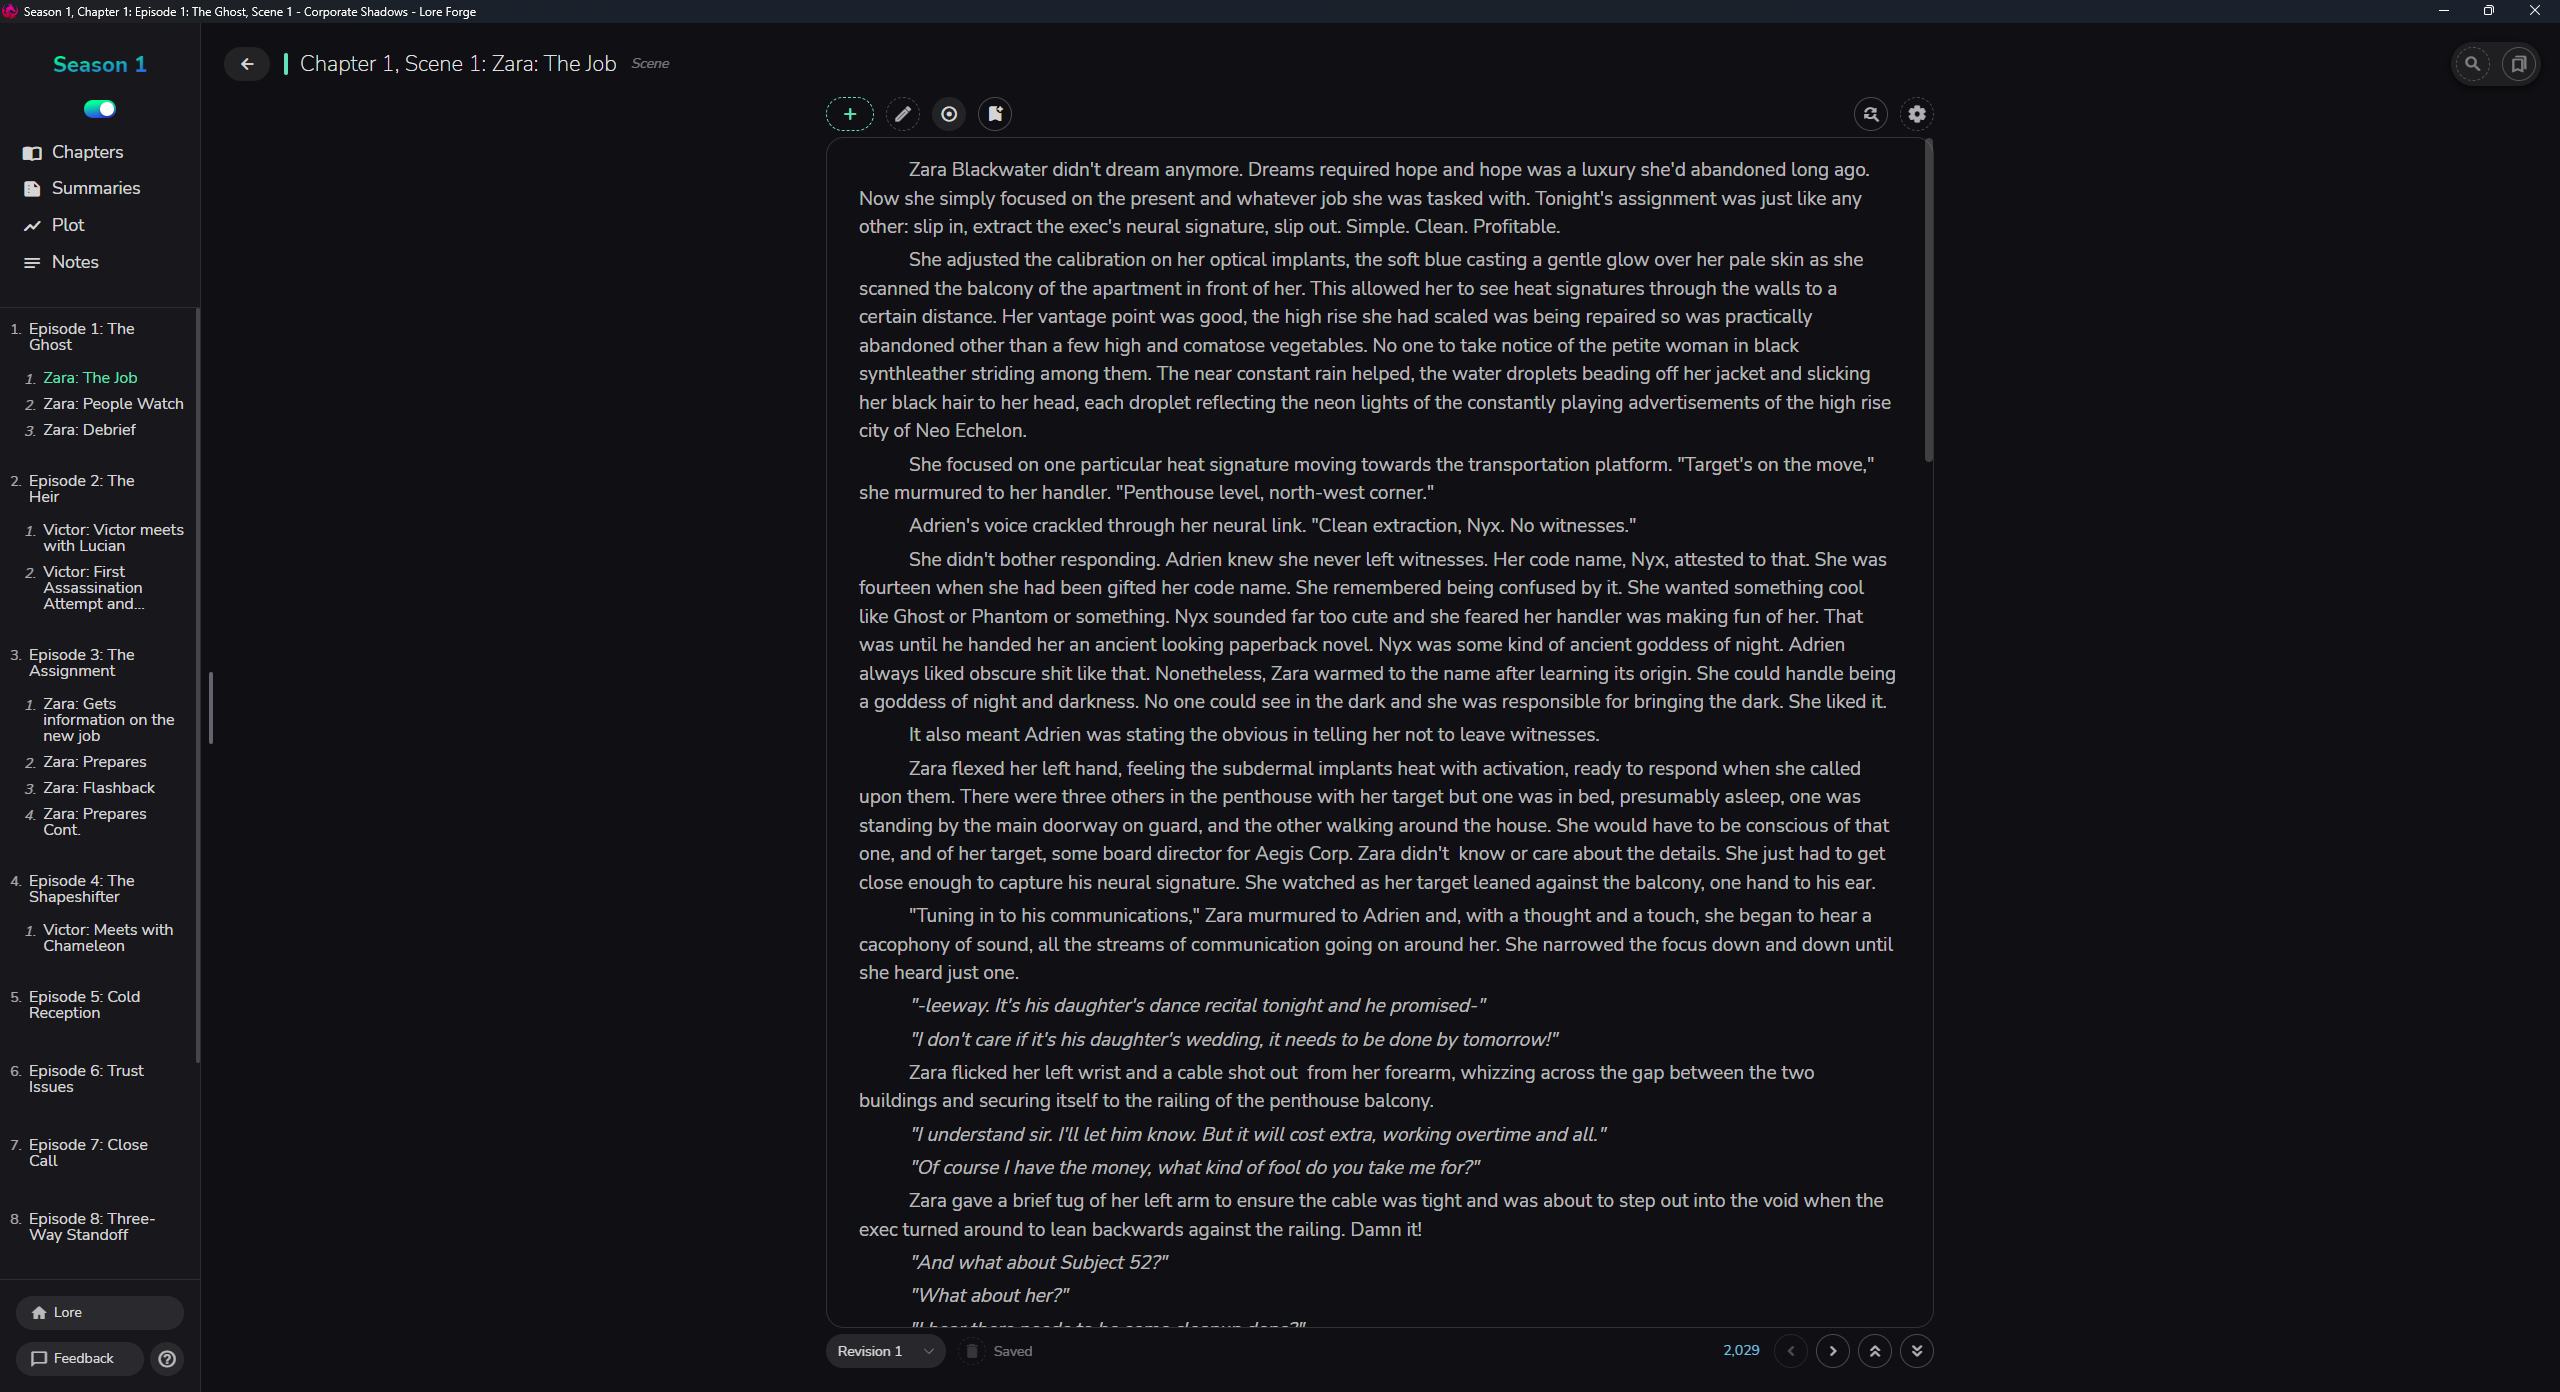
The editor is fairly basic, which I like as it means there’s less distractions while writing. It knows the shortcuts for bold and italics, and has a word count at the bottom of the screen. You can also click this word count number to switch between word count and character count, useful if you’re writing something that has a character limit.
At the top, there is a little drop-down menu to mark it as To Do (red), In Progress (yellow), or Done (green). That will then show on your Chapters and Summaries screen to show you at a glance where you’re up to. I tend to use red for not yet written, yellow for written but not yet edited, and green for editing completed.
Down the bottom it has a Revision dropdown box so since this is my first draft, it’s on Revision 1. Clicking it, I can add a Revision 2 which is useful when it comes time to edit so I can switch between versions.
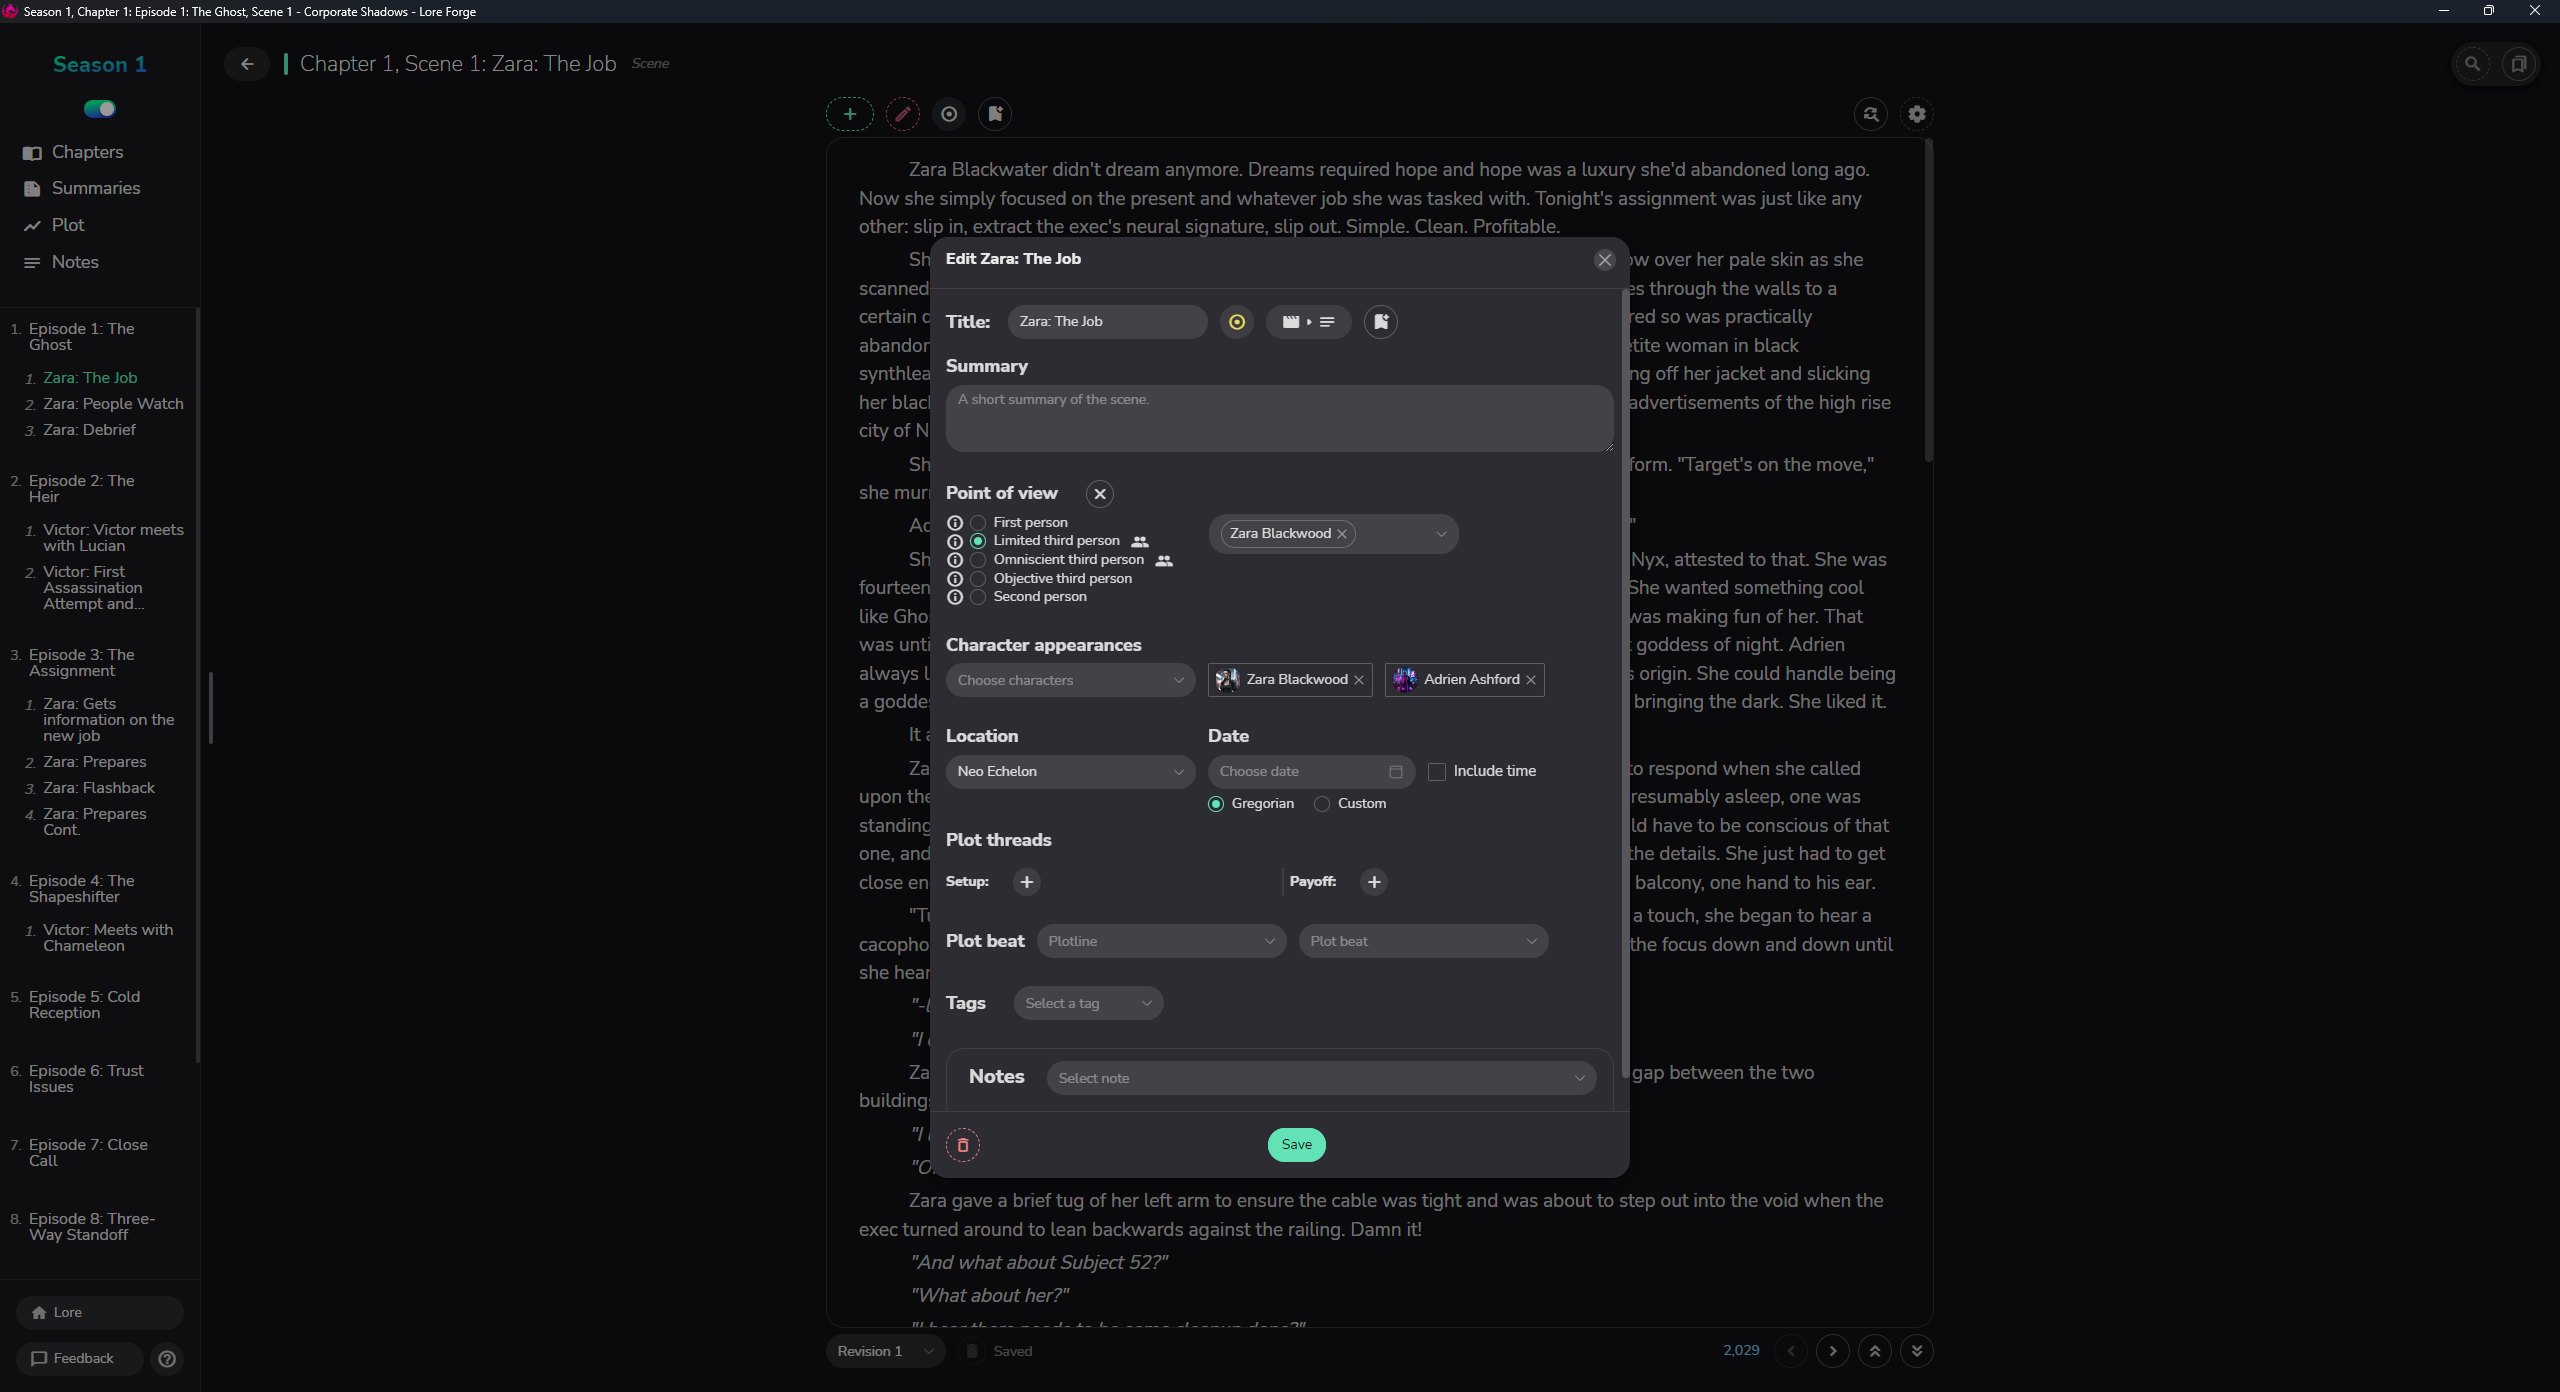
The edit metadata can be used or completely ignored, depending on how deep you like to go into your planning. It includes the point of view, characters in the scene, locations in the scene, plot threads, plot beats, tags, and applicable notes. I mostly ignore this section, but I do update it to show the point of view and what characters are in it, because then, on the character’s card, it will list what scenes they appear in.
Want more in depth analysis like this? Hit that subscribe button to get them straight to your inbox!
My Lore Forge Cons
This program isn’t perfect and there are a few things I wish I could change or include, so these are the things I don’t like about it.
No online backup without a subscription. I like things to automatically backup to the cloud and save locally. I’ve had far too many disasters that cause me to lose work when a hard drive fails or something just stops working for me to not want cloud backup alongside local backup. However, I understand that running those servers costs money, hence the subscription to help pay for it. I get around it by saving my backup folder to my Google Drive. It’s not ideal, but it’s better than nothing.
No tables in the editor I haven’t had this use case come up often, but sometimes in my notes, I want to include a table for something. The good news is, this is planned for a future update, however, at the time of writing, it’s not in there yet.
No timelines and events I love a good timeline and having one helps me keep straight in my head not only what’s happened during the story, but what happened before it. Thankfully, this is also planned for a future (more distant) update. At the moment, I use a Note that I keep pinned and visible across all stories. Not perfect, but it does the job in the meantime.
Switching between Project and Story Dashboards confused me at first until I got used to it. Now, it makes sense, so I can keep story specific things separate from series specific things. But to begin with, it took a bit to get the hang of, especially since the first project I created was for a standalone story.
My Lore Forge Pros
You’ve probably already guessed it, but this program has a lot of pros in my book. Still, I’ll summarise them here for you.
The cost (FREE). I cannot emphasise this enough. As someone who is largely reliant on a disability pension, my finances are pretty much entirely spoken for with basic living. So many programs either have an upfront cost or, worse, a subscription model that I just cannot justify, and if they have a free version, it’s so cut down that it’s no different from a basic word editor. The fact that Lore Forge includes so much functionality in its free version is a lifesaver for me. And, should my finances change in the future, the subscription it provides is fairly cheap, even accounting for exchange rates.
The level of detail that can be used or avoided. If I want to keep a character profile (or item or location etc) sparse, then it doesn’t clutter the card with empty spaces. It just doesn’t show what’s empty and only displays what I’ve filled in. This makes for a very clean interface, with the option of getting extremely detailed if you want it to be.
Multiple stories within the same project. This same but separate setup works so well with the way my brain works. I’m not sure how to explain it in words, just know that it makes sense to me in a way no other novel writing software has in the past.
The ability to drag and drop and move around scenes and chapters. Usually when I plot out a story, I create the chapters ahead of time, and create the scenes as I go. This means that sometimes I need to go back and stick a scene in the middle of a chapter. After a draft is completed, I then rearrange the scenes and chapters again so it’s less in line with what works for a writer and more for what works for a reader and makes someone keep turning the page. With Lore Forge, that’s really easy to do.
The Plot section. Anyone who’s been reading my work knows I love to organise a story with a plot structure before I start. The fact that this comes with so many built in plot structures I can use with just the click of a button, or I can create my own if I want, is just so handy.
The metadata. Sometimes if I’m procrastinating on the writing, I’ll play around with adding metadata and seeing how it affects the information. It’s fun. And probably could also go into the con list as something that’s easy to distract me. But it will be useful when it’s time to edit to ensure that the main protagonists have equal screen time, and the relationships between characters can be set up and so many other things.
A roadmap. Sometimes I think, “Wouldn’t it be nice if it did X?”. I can then go to the website and check the roadmap to see if that’s something that is being worked on. There’s nothing that removes the frustration of a lacking feature more than finding out that others also want it, the developer is aware of it, and is working on it.
Final Thoughts
So that turned out to be significantly longer than I thought it would, but I think I’ve mostly covered everything I wanted to. If this has at all piqued your interest, I invite you to download Lore Forge and give it a try yourself.
If you have any questions, please don’t hesitate to drop a comment and I’ll do my best to answer them.
Don’t want to commit to a recurring subscription? Buy me a coffee for the same amount as a month’s sub, drop your substack name, and I’ll gift you one month’s sub!
I'm glad you liked it and thanks for your super detailed comment 🙂
The last I looked at it, it was US$40 as well, but that's more expensive than any other writing software I've used over the years. I always used free versions of the expensive programs you mention (gimp instead of Photoshop and Google docs or libre Office instead of word). And then when you take into account the exchange rate to Australian dollars, it's about $100 for a program that I found counterintuitive and awkward to use. For perspective, that $100 is a AAA game, or my week's groceries and back when I was looking it was also one week's rent. Too much for my poor blood.
Thank you for sharing! I know I asked for this since I was curious and had never heard of it before. It looks cool! I also play D&D so double usage there. I'm glad you found something that works best for you! I'll check it out.
While I probably won't switch over to it entirely, I wanted to have resources available in case and to help spread the word to others!
Personally I do use Scrivener. I can see why it's complicated for newer users or those with less experience using complicated programs. So I understand that.
I'm surprised you find it expensive though... Maybe the price has gone up significantly? I got it for about $40 in 2018 and it's a lifetime license so I've never had an issue updating and never paid subscription money. When most programs cost like 100-300 a year (cough Adobe, cough Word) a 40 one time fee for a lifetime license was worth it for me.
For another free option I absolutely LOVE Notion and use it for organizing more than writing. Notion is complicated though... Maybe I love complicated programs 😂😂